Tile installation backsplash is the process of setting ceramic, porcelain, glass, or natural stone tile on the wall between your countertop and upper cabinets — typically covering 15–30 square feet in a standard kitchen. A professionally installed backsplash costs $300–$1,500+ in Greater Boston (as of 2026 pricing), depending on tile material and layout complexity. Most professional installations finish in 4–8 hours. DIY projects typically take 1–2 days.
- Material costs range from $1–$30 per sq ft — ceramic is the most affordable, glass the most expensive.
- Labor in Greater Boston runs $8–$18 per sq ft for professional installation, based on current 2026 market rates.
- Surface prep is critical — drywall is acceptable behind a backsplash, but cement board protects against moisture in high-heat zones near the range.
- Grout joint width depends on tile size — 1/16" for glass mosaic, 1/8" for subway tile, 3/16"+ for large-format tile.
- Thinset needs 24–48 hours to cure before grouting — rushing this step causes grout to crack or loosen.
- Order 10–15% extra tile to account for cuts, waste, and future repairs.
This guide covers every stage of tile installation backsplash — from choosing materials and planning layout to cutting tile around outlets and finishing with grout. It is a companion to our complete tile installation guide.
What Is Tile Backsplash Installation and Why Does It Matter in Your Kitchen?
A tile backsplash installation protects your kitchen wall from water, grease, and heat while adding a major design element. It is one of the highest-return upgrades in a kitchen renovation — done right, it lasts 20+ years with minimal maintenance.
The backsplash zone sits between the countertop and upper cabinets. This area takes daily splatter from cooking, cleaning, and steam. Without a proper tile installation, drywall absorbs moisture and breaks down. Grease stains painted walls that can't be scrubbed. A well-installed tile backsplash solves both problems permanently.
In our 15+ years of tile installation across Greater Boston, backsplash projects are the most requested kitchen upgrade we handle. The area is small enough to complete in a day, but the visual impact is dramatic. A new backsplash can define the entire look of a kitchen.
Planning a kitchen backsplash in the Greater Boston area? Get a free quote from Aguirre Modern Tile — tell us your tile material and kitchen size for a same-day estimate.
How Much Does Tile Backsplash Installation Cost in Greater Boston?
Professional tile backsplash installation in Greater Boston typically ranges from $300 to $1,500+, depending on tile material, layout complexity, and surface prep needed. Labor runs $8–$18 per sq ft based on current 2026 market rates in the area.
Project Scope | Tile Material | Material Cost | Labor Cost | Total Estimate |
|---|---|---|---|---|
Standard kitchen (20 sq ft) | Daltile ceramic subway | $20–$100 | $160–$360 | $300–$500 |
Standard kitchen (20 sq ft) | Florida Tile porcelain | $60–$200 | $160–$360 | $400–$700 |
Standard kitchen (20 sq ft) | Daltile glass mosaic | $140–$600 | $200–$400 | $500–$1,100 |
Full kitchen (30 sq ft) | MSI Calacatta marble | $150–$450 | $300–$540 | $700–$1,500+ |
All figures reflect current Greater Boston rates as of 2026 pricing. Complex patterns, specialty tile, or substrate repair adds to labor cost. No permit is required for a standard kitchen backsplash replacement in Massachusetts — permits apply to structural or electrical work, not tile finishing.
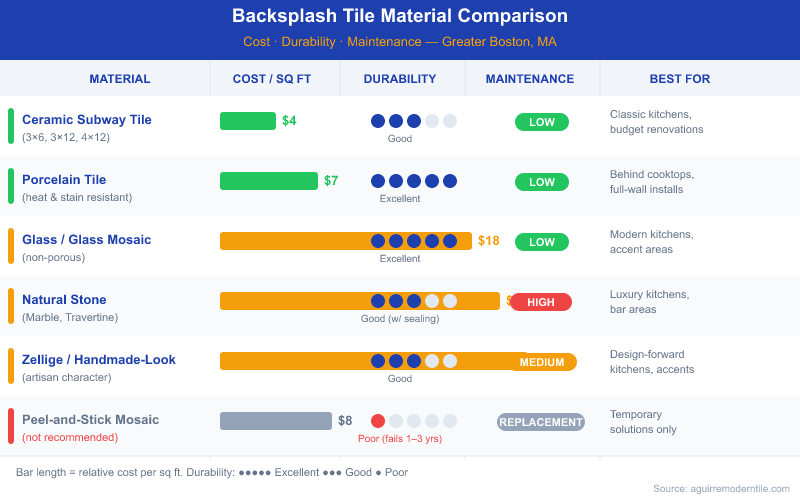
Which Tile Material Is Best for a Kitchen Backsplash?
The best backsplash tile balances durability, moisture resistance, and your budget. Ceramic and porcelain are the most practical choices. Glass and natural stone add visual impact but require more careful installation.
Tile Material | Cost per Sq Ft (Material Only) | Durability | Best For | Notes |
|---|---|---|---|---|
Ceramic (Daltile, MSI) | $1–$5 | Good | Budget kitchens, rentals | Easy to cut, widely available |
Porcelain (Daltile, Florida Tile) | $3–$10 | Excellent | High-use kitchens | Harder, requires wet saw |
Glass (Daltile Rittenhouse, Artistic Tile) | $7–$30 | Good | Modern or spa-style kitchens | Shows grout lines clearly; needs white thinset |
Natural Stone (MSI Calacatta Gold, Bedrosians) | $5–$15 | Good (with sealing) | Luxury kitchens | Must be sealed before and after grouting |
Zellige (Cle Tile, Clé) | $15–$40 | Moderate | Artisan or Mediterranean kitchens | Irregular surface; requires flexible adhesive |
All pricing reflects material costs only as of 2026 pricing in Greater Boston. Add $8–$18 per sq ft for professional installation labor.
How Do You Prepare a Wall Surface Before Installing Backsplash Tile?
Wall prep is the most important step in any tile installation backsplash project. Thinset bonds to the substrate, not to the tile. A clean, stable, level surface keeps your backsplash on the wall for 15+ years.
Painted drywall is acceptable for a kitchen backsplash above the counter. Sand it with 80-grit paper to break the gloss. Wipe it down with a degreaser — kitchen walls collect grease even where you can't see it. Let it dry fully before applying any adhesive. Never install tile over wallpaper. The adhesive will pull the paper away from the wall, and tiles will follow.
For areas directly behind the range or near a steam oven, install cement board (Hardiebacker or USG Durock) as the substrate. It resists moisture and won't swell or degrade with heat. Fasten it with coated backer board screws every 6–8". Tape seams with alkaline-resistant mesh tape. This upgrade adds about $1–$2 per sq ft to material cost but significantly extends durability in high-heat zones.
According to TCNA (Tile Council of North America) installation standards, 95% thinset contact coverage is required for wall tile. Back-butter individual tiles whenever you can't hit that number with wall application alone.
What Are the Most Popular Backsplash Tile Patterns and Layouts?
Your tile pattern affects both material waste and installation time. Start every layout from the center of the wall — not from a corner — so cuts are equal on both sides.
Here are the most common tile installation backsplash patterns:
- Running bond (offset/brick): The most popular choice for subway tile. Each row offsets by half a tile width. Easy to install with minimal waste.
- Stacked (grid): Tiles align in both directions. Clean, modern look. The easiest pattern to install and calculate.
- Herringbone: Tiles set at 45-degree angles in a V-pattern. Dramatic visual effect. Adds 15–20% more cuts and waste.
- Vertical stack: Subway tiles stacked vertically instead of horizontally. Makes low ceilings feel taller.
- Basketweave or pinwheel: Intricate geometric patterns. Usually pre-mounted on mesh sheets to simplify installation.
Snap a vertical centerline with a chalk line before setting any tile. Work outward from center so edge cuts are balanced. Skipping this step is one of the most common mistakes in DIY tile installation.
Step-by-Step: How Is a Tile Backsplash Professionally Installed?
A professional tile installation backsplash follows a fixed sequence. Skipping or rushing any step shortens the life of the finished surface.
In over 500 completed projects across Greater Boston, the most common mistake we see is poor surface prep. Painted drywall needs to be scuffed with 80-grit sandpaper so the adhesive bonds properly. Glossy or greasy walls cause tiles to slip or pop off within months.
- Measure the area and calculate square footage (length × height of each section)
- Choose tile and adhesive — thinset for most tile types, mastic for lightweight ceramic on dry walls
- Find the center of the backsplash and snap a level layout line
- Dry-lay tiles on the counter to test your pattern before committing
- Spread adhesive with a notched trowel — use a 3/16" V-notch for small tile, 1/4" square-notch for larger formats
- Set tiles with spacers, pressing firmly and checking level constantly
- Let thinset cure for 24–48 hours
- Apply grout, wipe haze, and seal porous tile
How Do You Cut Tile for a Backsplash?
Tile cutting slows down most DIY projects. Outlets, switches, window edges, and inside corners all need precise cuts. The right tool depends on your tile material and cut type.
- Manual tile cutter (score-and-snap): Best for straight cuts on ceramic and standard porcelain. Fast and clean. Cannot cut curves or notches.
- Wet saw (tile saw): Handles porcelain, glass, and natural stone. Makes straight, angled, and narrow cuts. Required for most backsplash projects beyond basic ceramic.
- Angle grinder with diamond blade: Best for L-shaped cuts around outlets. Mark the outlet opening, make two passes, and snap out the notch.
- Tile nippers: Good for small curved cuts around pipes or rounded corners. Slow but precise for small adjustments.
- Glass tile blade: Glass tile needs a continuous-rim diamond blade rated for glass. Standard blades chip edges badly.
Marble and most natural stone cannot be cut with a score-and-snap cutter. Always use a wet saw for stone tile. Full-body porcelain rated at 0.5% or lower water absorption also requires a wet saw — a manual cutter will crack it.
To cut around outlets, turn off the circuit first. Pull the outlet slightly forward from the box so tile can slide behind the faceplate. Measure the outlet position from the nearest tile edge. Transfer the measurement to your tile with a pencil. Use an angle grinder or wet saw to cut the notch. Test-fit before applying adhesive. Aim for gaps no wider than 1/8" — the outlet cover will hide minor imperfections.
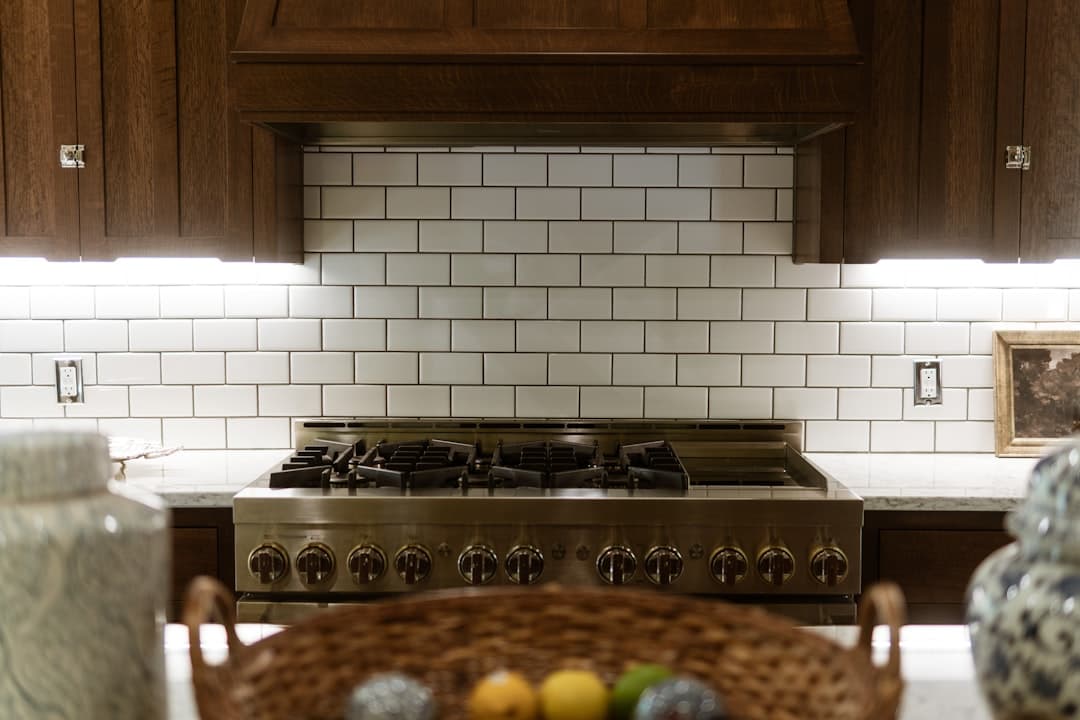
Subway Tile Backsplash Installation: The Most Popular Choice
Subway tile — the classic 3×6 inch rectangular tile — is the top-selling backsplash tile in the U.S. It works in traditional and modern kitchens. Its simple shape makes cutting and installation easier than specialty formats.
Standard subway tile costs $3–$6 per square foot installed with professional labor in Greater Boston, based on current 2026 pricing. Material alone runs $1–$4 per sq ft for ceramic subway tile. Use 1/8" grout joints for standard 3×6 subway — wider joints look blocky at this scale.
Grout color is one of the biggest design decisions. White grout on white tile looks seamless but shows grease. Gray or charcoal grout defines each tile, hides dirt, and is very popular in modern kitchens. Contrasting dark grout on white tile is a strong 2025–2026 trend. Use unsanded grout for 1/8" joints. Sanded grout is for joints 3/16" and wider.
For more on subway tile design and pattern options, see our subway tile installation guide — it covers offset ratios, vertical stacking, and long-format subway tile.
Specialty Backsplash Tiles: Zellige, Glass, Mosaic, and Peel-and-Stick
Specialty tiles add character but each type has specific installation requirements. Using the wrong adhesive or grout joint can ruin the look or cause early failure.
Zellige Tile Installation
Zellige tile is a handmade Moroccan clay tile with an irregular surface, uneven thickness, and variation in glaze color. Each tile must be back-buttered individually with a polymer-modified thinset. Because the surface is uneven, a large-format float won't bridge the dips cleanly. Use sanded grout for 3/16"+ joints and seal with a penetrating sealer before grouting to prevent staining.
Glass Tile Installation
Glass tile is unforgiving. Any gray or off-white thinset shows through the tile face. Always use white polymer-modified thinset (such as Mapei Ultraflex LFT White) under glass. Back-butter each tile and apply thinset to the wall for 100% coverage — voids show as dark shadows through glass. Use a continuous-rim diamond blade on a wet saw for all cuts.
Mosaic Tile Installation
Mosaic tiles — typically 1×1", 2×2", or mixed formats — come mounted on 12×12" mesh sheets. Spread thinset evenly with a 3/16" V-notch trowel. Press each sheet firmly so all tiles embed fully. Use unsanded grout at 1/16" joints for glass mosaic and unsanded at 1/8" for ceramic mosaic. Grout color is especially visible at this small scale — choose carefully.
Peel-and-Stick Backsplash Tiles
Peel-and-stick tiles — products like Smart Tiles or Aspect tile — require no thinset, no grout, and no special tools. They apply directly to clean, dry drywall. They are a genuine option for renters or temporary installs. However, they are not waterproof, can peel in high-humidity zones near the stove, and will not last as long as thinset-set tile. For a permanent kitchen backsplash, use real tile with proper adhesive.
Backsplash Grouting, Caulking, and Sealing
Grouting is the final structural step in a tile installation backsplash project. Wait the full 24–48 hours after setting tile before grouting. Uncured thinset flexes when you work the grout float across it, causing tiles to shift.
What Type of Grout Should You Use?
- Unsanded grout: For joints under 3/16". Use with glass, polished stone, and subway tile. Sand particles scratch polished surfaces.
- Sanded grout: For joints 3/16" and wider. Sand adds body and prevents shrinkage in wider gaps.
- Epoxy grout (Mapei Kerapoxy, Laticrete SpectraLOCK): Stain-proof and needs no sealing. Harder to work with. Recommended for white grout in cooking zones where splatter is constant.
Mix grout to a peanut-butter consistency. Apply with a rubber float held at a 45-degree angle. Work in small sections — about 10–15 sq ft at a time. Remove haze with a damp sponge within 20–30 minutes before it hardens. Products like Aqua Mix Grout Haze Cleanup work on stubborn residue after 24 hours.
Caulking the Countertop-to-Backsplash Joint
Never grout the joint where tile meets countertop. That seam is a movement joint. The counter and wall expand and contract at different rates, and grout at this joint will always crack. Use a 100% silicone caulk matched to your grout color. Mapei, Laticrete, and Custom Building Products all make grout-matching caulk. Apply a smooth bead and tool it flat with a wet finger or caulk tool.
Sealing Porous Tile
Ceramic and porcelain tile don't need sealing — they are vitrified and non-porous. Natural stone, zellige, and unglazed terra cotta must be sealed. Apply a penetrating stone sealer (such as Aqua Mix Sealer's Choice Gold) before grouting to prevent grout from staining the tile surface. Reapply the sealer annually. Seal grout itself with an impregnating grout sealer after it cures for 72 hours — this blocks grease and cooking residue from soaking in.
For a deeper look at waterproofing principles, see our shower tile installation guide — the same moisture-management standards apply to any high-humidity tile area.
Should You DIY or Hire a Professional for Tile Backsplash Installation?
A basic ceramic or subway tile backsplash is one of the most DIY-friendly tile projects available. The area is small, waterproofing is not required in most cases, and mistakes are easy to correct before grout sets.
When DIY Makes Sense
- Simple grid or running bond pattern with standard subway or ceramic tile
- Flat, clean drywall with minimal outlets or obstacles
- You are comfortable using a wet saw or willing to rent one
- Budget is tight and the tile material is forgiving — ceramic, not glass or marble
- You have a full weekend available — don't compress a two-day project into one
When to Hire a Professional
- Natural stone, zellige, or large-format tile — these require precision cutting and back-buttering
- Herringbone or complex geometric patterns with many diagonal cuts
- Full wall installations — floor-to-ceiling or behind open shelving
- Existing tile removal before new tile installation
- Moisture damage behind existing backsplash that needs substrate repair
Across 500+ projects in Greater Boston, as certified tile installers we see DIY backsplash jobs fail most often at three points: uneven thinset coverage, inconsistent grout joints, and skipped caulk at the countertop seam. All three are avoidable with the right tools and enough time.
Kitchen Floor Tile Installation: What Changes Near the Backsplash
Kitchen floor tile and backsplash tile are installed differently, but they need to work together visually and structurally. The floor takes more abuse — foot traffic, dropped dishes, and cooking grease — so it needs tougher tile and thicker adhesive beds.
For kitchen floors, use tile rated PEI 3 or higher (Porcelain Enamel Institute wear rating). Backsplash tile has no PEI requirement because it takes no foot traffic. A beautiful glass mosaic works on a wall but would shatter on the floor. Porcelain is the most popular kitchen floor tile — it handles grease, moisture, and heavy use without absorbing stains.
Under-cabinet areas need planning. Base cabinets are typically installed before flooring in new construction, so tile runs under the toe kick. In renovations, floor tile usually stops at the cabinet face. Either approach works — just plan for it before you cut tile. Consistent grout joints between floor and backsplash areas reinforce the visual connection between both surfaces.
For more on kitchen floor tile decisions, see our guide on kitchen tile installation.
How Do You Maintain and Seal a Tile Backsplash Long-Term?
A properly installed tile backsplash needs very little maintenance. Ceramic and porcelain tile only need regular cleaning with a mild, pH-neutral cleaner. Natural stone and zellige need annual sealing to stay stain-free.
Grout is the most vulnerable part of any backsplash. Even sealed grout can absorb grease over years of cooking. Regrout lines that have cracked, crumbled, or stained through. Use a grout saw or oscillating tool to remove damaged grout, then apply fresh grout and reseal. For white grout in active cooking zones, consider switching to an epoxy grout on your next install — it resists staining without sealing.
Silicone caulk at the countertop seam typically lasts 5–10 years before it cracks or peels. Replace it when you see gaps or discoloration. This joint is your first line of defense against water getting behind the tile. According to TCNA guidelines, all tile-to-countertop joints should be caulked, not grouted, and inspected annually.
Transition Strips and Edge Finishing
Raw tile edges look unfinished and chip over time without proper edge treatment. Here are the most common solutions:
- Bullnose tile: A tile with one factory-finished rounded edge. Use at all exposed vertical edges and top rows.
- Schluter JOLLY profile: An aluminum or stainless trim strip that caps tile edges. Available in brushed nickel, matte black, and polished chrome. Best when matching bullnose isn't available.
- Schluter RONDEC: A rounded-edge trim for a softer look. Popular for subway tile when bullnose isn't offered in the tile line.
- Grout and caulk only: Acceptable at inside corners only. Never leave an outside edge without bullnose or metal trim.
Exposed tile cores absorb moisture and chip under impact. Budget for edge finishing from the start — not as an afterthought.
Dye Lots, Quantity Calculations, and Ordering Smart
Tile is manufactured in batches called dye lots. Tiles from different lots may have subtle color or texture variation when installed side by side. Always buy all your tile in one order, from the same dye lot number. Check the lot number on every box before you purchase.
Calculate your order quantity this way: measure total backsplash square footage, add 10% for a simple layout and 15% for diagonal or herringbone patterns, then round up to the nearest full box. A standard kitchen backsplash of 20 sq ft with a subway layout needs about 22–23 sq ft of tile. Store leftover tile — future repairs are nearly impossible to match years later without it.
A 50 lb bag of thinset covers approximately 40–50 square feet of backsplash with a standard 3/16" V-notch trowel. One bag is typically enough for a standard kitchen backsplash. Per TCNA installation standards, 95% thinset contact coverage is required for wall tile.
Ready to Install Your Kitchen Backsplash the Right Way?
A tile installation backsplash is one of the highest-impact upgrades you can make in a kitchen. Done right, it lasts 20+ years and survives daily cooking, cleaning, and steam. Done wrong, tiles pop, grout cracks, and moisture gets behind the wall.
At Aguirre Modern Tile, we have installed hundreds of backsplashes across Greater Boston — from simple ceramic subway tile to full-wall zellige and marble installations. We handle everything: surface prep, precise cuts around outlets, professional grouting, and edge finishing with Schluter profiles.
Ready to get your kitchen tile installation backsplash done by a certified professional? Contact Aguirre Modern Tile today for a free consultation. Tell us your tile choice, kitchen layout, and approximate square footage — and we will send you a clear, detailed estimate with no surprises.
Frequently Asked Questions
How much does backsplash tile installation cost in Greater Boston?▾
Can you tile a backsplash over drywall?▾
How long does a backsplash tile installation take?▾
What is the best adhesive for backsplash tile?▾
How do you grout a backsplash?▾
Do you need to seal a kitchen backsplash?▾
Need Backsplash Installation?
Send us photos and get a same-day estimate.