Tile Installation How To: Step-by-Step Guide for Beginners
Tile installation how to is a multi-step process covering surface prep, layout planning, mortar application, tile setting, grouting, and sealing — typically spanning 3–7 days from demo to final seal depending on room size and tile type. This guide walks you through every phase in plain language, from the tools you need to the mistakes that wreck a DIY job. For a full overview of tile types, costs, and professional options, see the Tile Installation Complete Guide.
Working on a bathroom floor or shower tile project? Send us photos for a free same-day bathroom tile estimate — we cover all of Greater Boston.
Tools & Materials You Need Before You Start
Gather everything before you begin. Running to the hardware store mid-project is how tiles get set crooked. Here is what you need for a standard floor or wall tile installation how to project.
- Wet saw (7" diamond blade for most tile; 10" blade for large-format)
- Angle grinder with diamond blade for notch cuts around pipes
- Notched trowel — 3/16" V-notch for mosaic, 3/8" square-notch for standard tile, 1/2" square-notch for large-format
- Margin trowel for mixing and detail work
- Grout float (rubber-faced)
- Tile spacers — 1/16", 1/8", or 3/16" depending on joint width
- Tile leveling system (Raimondi, Tuscan Leveling, or similar) for tiles larger than 12×12
- 4-foot level and chalk line
- Mixing drill with paddle attachment (at least 1/2" chuck, variable speed)
- Grout sponge and bucket
- Knee pads — your knees will thank you on day two
- Thinset mortar — modified (polymer-fortified) for most jobs; unmodified with Schluter DITRA or similar uncoupling membranes
- Cement backer board (1/2" for floors, 1/4" for walls) or Schluter DITRA for floor uncoupling
- Alkali-resistant mesh tape for backer board seams
- Waterproofing membrane (Schluter Kerdi, Laticrete Hydro Ban, or RedGard for wet areas)
- Grout — sanded for joints wider than 1/8", unsanded for narrower joints
- Grout sealer and penetrating tile sealer for natural stone
- Caulk — 100% silicone in a matching grout color for corners and transitions
Skipping any of these — especially the leveling system and the right trowel size — is where most DIY jobs go sideways. If you are tiling a shower or bathroom, add Schluter Kerdi or Laticrete Hydro Ban to the list. Waterproofing is non-negotiable in wet areas.
Step 1: Assess and Prepare the Subfloor
Tile fails when it starts on a bad surface. The most important rule in tiling: tile is only as solid as what is under it. Fix the subfloor first, and every step after gets easier.
What Subfloor Flatness Standard Do You Need?
Subfloor flatness is the most overlooked requirement in DIY tile projects. Per TCNA (Tile Council of North America) standards, your subfloor must be flat within 3/16" over 10 feet for standard ceramic and porcelain tile. For large-format tile (anything 15" or longer on one side) or natural stone, the tolerance tightens to 1/8" over 10 feet. Use a 10-foot straightedge or long level to check. Mark high and low spots with a pencil.
To fix low spots, use a floor-leveling compound like Mapei Ultraplan 1 Plus or Laticrete NXT Level. Pour it, spread it, and let it cure per the manufacturer's instructions — usually 3–4 hours before tiling. Grind down high spots with an angle grinder. Do not skip this step. Lippage (tiles sitting at different heights) almost always traces back to a surface that was not properly flattened.
Deflection also matters. The subfloor must meet L/360 minimum deflection for ceramic tile — meaning a 10-foot span can flex no more than 1/3" under load. For large-format tile or natural stone, you need L/720. In older Greater Boston homes — triple-deckers, Victorians, and colonial-era construction — we frequently find 1×6 board subfloors that deflect too much. Adding a layer of 3/4" plywood before the backer board is the right fix in those cases.
Removing Existing Flooring
Tile can go over existing tile if it is firmly bonded, flat, and in good condition. In most cases, removing old flooring first is the better call. Sheet vinyl and linoleum should always come up — they flex too much to bond properly. Use a floor scraper and heat gun for vinyl. For old ceramic tile, a rotary hammer with a chisel bit works best. Wear eye protection and knee pads.
Pro Tip: In pre-1980 Greater Boston homes, old resilient flooring may contain asbestos. Test it with a mail-in kit before disturbing it. If results are positive, hire a licensed abatement contractor. This is not optional.
Step 2: Install Cement Backer Board or Uncoupling Membrane
Never install tile directly on drywall or over an OSB subfloor alone. You need a stable, tile-ready substrate between the subfloor and your tile.
What Is Cement Backer Board?
Cement backer board is a rigid panel made of cement and aggregate. It gives tile a dimensionally stable surface to bond to. Common brands include HardieBacker, USG Durock, and National Gypsum PermaBase. Use 1/2" thick panels for floors and 1/4" panels for wall applications.
Install with 1-1/4" corrosion-resistant screws at 6" on center in the field and 8" along edges. Offset seams from the subfloor seams below. Tape all seams with alkali-resistant mesh tape and thinset — do not use drywall tape.
What Is Schluter DITRA?
Schluter DITRA is a polyethylene uncoupling membrane that isolates the tile layer from subfloor movement. It is 1/8" thick, lightweight, and approved over wood and concrete subfloors. DITRA requires unmodified thinset both under the membrane and to bond tile to it. For heated floors, use Schluter DITRA-HEAT, which has channels built in for electric heating cables. DITRA reduces lippage risk from subfloor flex — a major advantage in older homes.
Step 3: Waterproof Wet Areas
Waterproofing is mandatory for showers, tub surrounds, and bathroom floors. Many DIYers skip this step and pay for it later with mold, failed grout, and delaminating tile.
For showers, apply a sheet membrane like Schluter Kerdi or a liquid membrane like Laticrete Hydro Ban or Custom Building Products RedGard to all walls and the floor. Kerdi requires thinset to embed it. Liquid membranes like Hydro Ban and RedGard are rolled or brushed on — apply two coats and let each dry fully. Pay special attention to corners and seams. Embed fabric tape in the liquid membrane at inside corners for added protection.
Pro Tip: In our 15+ years of tile installation across Greater Boston, failed waterproofing is the number one cause of shower tile callbacks. The extra $80–$150 in waterproofing materials prevents a $3,000–$8,000 teardown later.
Step 4: Plan Your Layout Before You Set a Single Tile
Good tile layout prevents the most visible DIY mistake: tiny slivers of tile at the edges of a room. Spend 30 minutes on layout planning. It saves hours of regret.
Find the center of the room by snapping chalk lines from the midpoint of each wall. Where the lines cross is your starting point. Dry-lay a row of tiles (with spacers) in both directions from the center. Look at where the last tile falls at the wall. If it lands as a sliver less than half a tile wide, shift your starting point by half a tile width. The goal is balanced, roughly equal cuts on opposite walls — and cuts larger than half a tile wherever possible.
For diagonal or herringbone patterns, your starting point shifts. For a diagonal layout, find the center of the room and rotate your chalk lines 45 degrees. Order 15% extra tile for diagonal and herringbone patterns (vs. 10% for straight lay) to account for additional cuts at every wall edge.
Pro Tip: In kitchens and bathrooms, always account for cabinets and fixtures in your layout. A tile centered in the open floor but creating a 2" sliver under the vanity looks worse than an off-center layout. Dry-fit the whole room before you mix any thinset.
Step 5: Mix and Apply Thinset Mortar
Thinset mortar bonds tile to the substrate. Choosing the wrong type — or mixing it wrong — causes tiles to pop off months later.
Modified vs. Unmodified Thinset
Modified thinset contains polymer additives that increase bond strength and flexibility. Use it for most standard floor and wall tile jobs on concrete, backer board, or existing tile. Common options include Mapei Ultraflex 2, Laticrete 254 Platinum, and Custom Building Products VersaBond.
Unmodified thinset contains no polymers. Use it when installing over uncoupling membranes like DITRA or sheet waterproofing membranes like Kerdi — the membrane manufacturers require it to ensure proper vapor transmission.
Mix thinset with a drill and paddle mixer. Add water to the bucket first, then powder. Mix to a peanut butter consistency — it should hold a notch without slumping. Let it slake for 5–10 minutes, then remix before use. Do not add more water after slaking. According to manufacturer guidelines, a 50 lb bag of thinset covers approximately 40–50 sq ft at a 3/8" depth.
Choosing the Right Trowel Notch Size
Trowel notch size determines mortar coverage. Per TCNA standards, you need a minimum of 80% back coverage on each tile in dry areas and 95% coverage in wet areas and exterior applications. Insufficient coverage creates hollow spots that crack under foot traffic.
- 3/16" V-notch: Mosaic tile, small wall tile up to 4×4
- 3/8" square-notch: Standard floor and wall tile, 4×4 up to 12×12
- 1/2" square-notch: Large-format tile, 12×24 and larger
- 3/4" square-notch: Very large format, 24×48 and stone slabs
For large-format tile, always back-butter each tile in addition to troweling the substrate. Apply a skim coat of thinset to the back of the tile with a flat trowel, then comb additional thinset onto the floor. This ensures full coverage and eliminates hollow spots on heavy, rigid tile.
Pro Tip: Check your coverage by lifting a freshly-set tile within the first few minutes. The back should be uniformly coated — no bare spots. If you see bare areas, switch to a larger trowel or back-butter the tile.
Step 6: Set the Tile
Work in small sections — roughly 10–15 sq ft at a time. Thinset has a working time of 20–30 minutes depending on temperature and humidity. In summer or direct sunlight, it skins over faster. Do not spread more than you can tile in that window.
Press each tile firmly into the thinset with a slight twisting motion. Use a rubber mallet and beating block to seat the tile and ensure full contact. Insert spacers as you go. Check your work with a level every few tiles. Adjust right away — once thinset skins over, you cannot reposition tile without pulling it and re-spreading.
For cuts at walls and around obstacles, measure twice and cut once on the wet saw. Score-and-snap tile cutters work only for straight cuts on thin ceramic tile. They fail on porcelain, natural stone, and anything thicker than 3/8". For notch cuts around pipes or outlet boxes, use an angle grinder with a diamond blade or a jigsaw with a tile blade.
Let the thinset cure before walking on the tile. Standard thinset reaches walk-on strength in 24 hours under normal conditions (65–80°F). In cold basements or during a Boston winter, it can take 48 hours or more. Do not grout until thinset has cured for at least 24 hours — 72 hours is better on large-format tile.
Step 7: Grout and Finish the Joints
Grouting is where many DIY tile jobs get ruined. The technique is simple, but timing and cleanup are critical.
Choosing the Right Grout
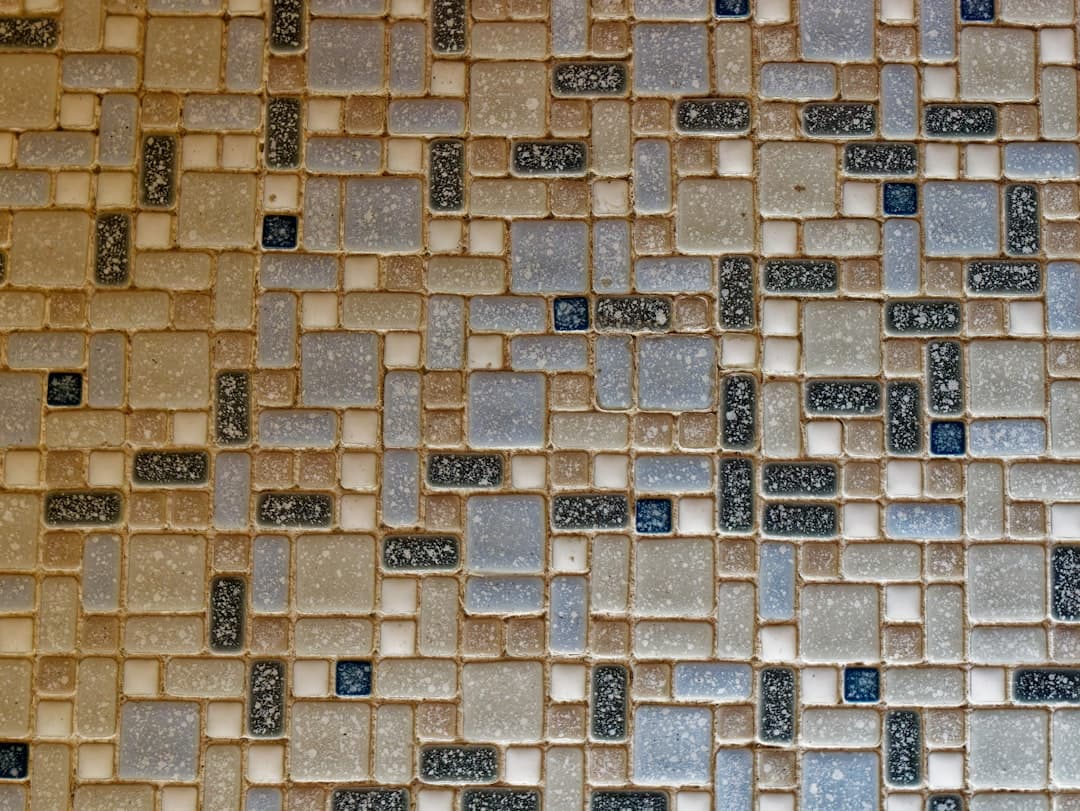
- Sanded grout: Use for joints wider than 1/8". The sand filler prevents shrinkage cracking in wider joints. Options: Mapei Keracolor S, Laticrete PermaColor.
- Unsanded grout: Use for joints 1/16"–1/8" wide. Sanded grout can scratch polished marble and glass tile. Options: Mapei Keracolor U, Custom Building Products Polyblend Plus Unsanded.
- Epoxy grout: Highly stain-resistant and does not require sealing. Use for kitchen counters and any area with heavy grease or chemical exposure. It sets faster and is harder to clean up — plan carefully. Leading options: Laticrete SpectraLOCK and Mapei Kerapoxy.
How to Grout Tile
Remove all spacers before grouting. Mix grout to a smooth, peanut butter consistency. Hold the grout float at a 45-degree angle and press grout diagonally across the joints. Working at an angle keeps the float from dragging grout back out. Pack the joints fully.
Then hold the float at a 90-degree angle and sweep diagonally across the tile to remove excess grout from the surface. Wait until the grout becomes hazy and firm — typically 15–30 minutes depending on temperature. Wring out a damp sponge (not soaking wet) and wipe the tile surface in circular motions. Rinse the sponge constantly. Too much water weakens the grout and causes efflorescence.
After the grout has dried fully — 24 hours minimum — buff off any remaining haze with a dry microfiber cloth. For stubborn haze, use a grout haze remover like Aqua Mix Concentrated Stone, Tile and Grout Cleaner.
Caulk, Not Grout, at Corners and Changes in Plane
Any inside corner — where the floor meets the wall, where two walls meet, and around the tub deck — must be filled with 100% silicone caulk in a color matching your grout. Grout is rigid and will crack at corners because the two surfaces move independently. Silicone is flexible and absorbs that movement. Use a product like Mapei Flexcolor CQ or Laticrete Latasil — they come in grout-matching colors and are made for tile applications.
Pro Tip: Let the silicone caulk cure for a full 72 hours before exposing it to water. Running a shower too early is the fastest way to get mildewed caulk that peels within a year.
Step 8: Seal the Grout and Natural Stone
Grout is porous. Unsealed grout absorbs stains within weeks in a kitchen or bathroom. Most homeowners skip sealing — and then wonder why their grout looks dirty six months later.
Apply a penetrating grout sealer — such as Mapei UltraCare Penetrating Plus Stone & Tile Sealer or Miracle Sealants 511 Impregnator — after the grout has cured for at least 72 hours. Apply with a foam brush or applicator bottle. Let it penetrate for 5–10 minutes, then wipe off excess. Two coats provide better protection. Reapply every 1–3 years depending on traffic — annually in a busy kitchen or family bathroom, every 2–3 years in a low-traffic guest bath.
Natural stone (marble, travertine, slate, limestone) requires a full penetrating tile sealer in addition to grout sealing. Apply before and after grouting. Epoxy grout is the one exception — it does not require sealing and provides permanent stain protection.
DIY Tile Installation for Beginners: Start Here
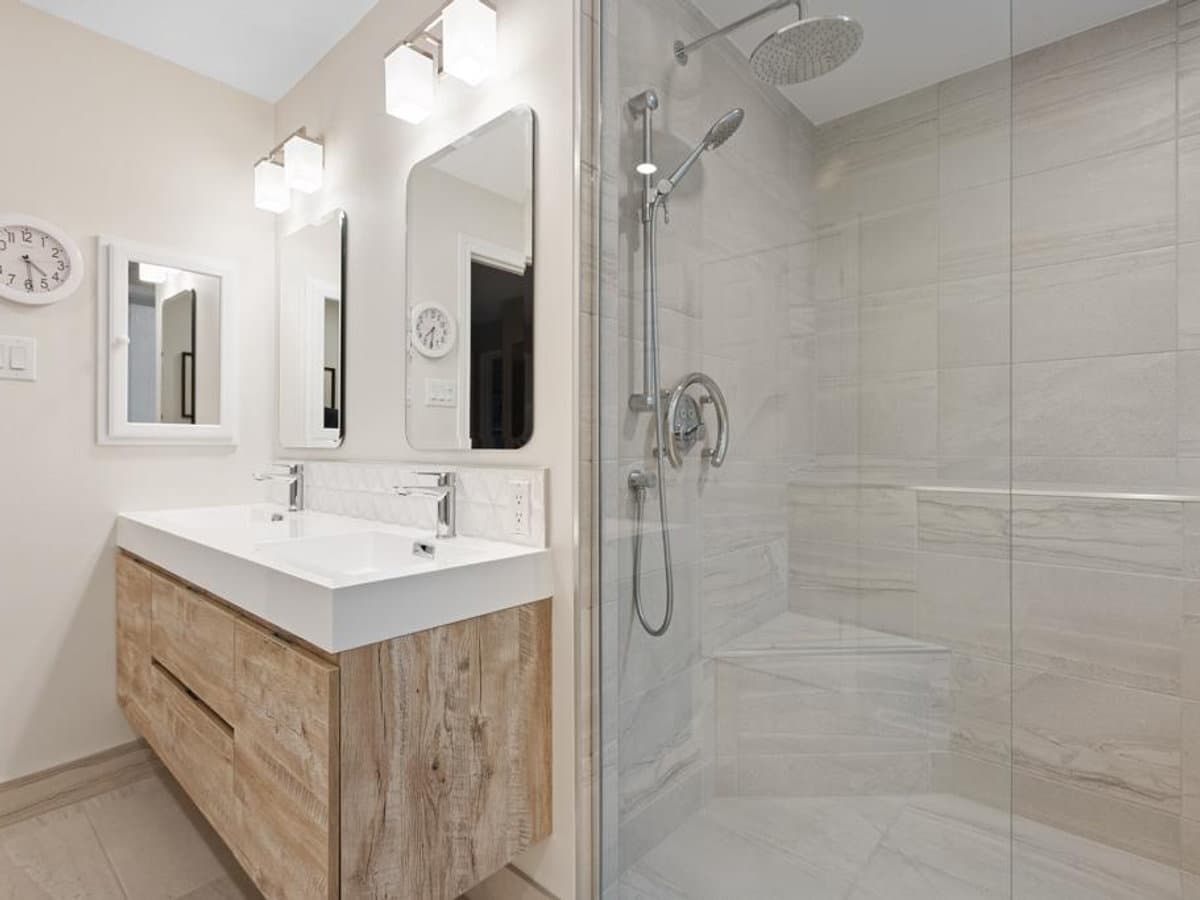
If this is your first tile project, start small and flat. A bathroom floor or laundry room is a better first project than a shower or large kitchen floor. Shower tile involves waterproofing, slope, curb work, and niche installation — all of which require more skill and leave less margin for error.
Choose a mid-size rectified porcelain tile — something in the 12×12 to 16×16 range — for your first project. Rectified tile has precise, uniform edges, which makes alignment easier. Avoid large-format tile (anything longer than 24") on your first project. Large-format tile is unforgiving of any subfloor irregularity and requires a leveling system. Also avoid natural stone — it is heavy, difficult to cut, and needs careful sealing.
Budget for mistakes. Order 10% extra tile for a straight lay and keep the leftover for future repairs. Cuts at walls often eat more tile than beginners expect. Accept that your first cuts may be rough — a baseboard or quarter-round trim piece hides most wall-edge imperfections.
Tile Installation Methods and Techniques Explained
Your installation method should be chosen before you start. The wrong choice mid-project is expensive to correct. Here is a comparison of the main methods used in residential tile installation how to projects.
Method | Best For | Key Requirement | Skill Level |
|---|---|---|---|
Modified Thinset (thin-bed) | Most floor and wall tile over backer board or concrete | Flat substrate, correct trowel size | Beginner–Intermediate |
Unmodified Thinset over DITRA | Wood subfloors, radiant heat systems | DITRA membrane, unmodified mortar only | Intermediate |
Mastic adhesive | Dry wall tile only (backsplashes, accent walls) | Dry surfaces — fails completely if wet | Beginner |
Medium-bed mortar | Large-format tile (12×24 and up), lippage control | Higher mortar bed to fill low spots | Intermediate–Advanced |
Mortar bed (mud bed) | Custom shower floors, sloped surfaces, curb work | Float rod, slope gauge, significant skill | Advanced / Professional |
Mastic adhesive is often sold as an easy alternative to thinset. Never use it in wet areas, on floors, or anywhere with temperature swings. It re-emulsifies when it gets wet and will release tile over time. Stick to thinset for any floor, shower, or exterior application.
Large-Format Tile Installation: What Changes
Large-format tile (anything 24" or longer on one side) adds several challenges that standard tile does not. Plan for them before you start.
- Subfloor tolerance tightens to 1/8" over 10 feet — any more variation causes lippage that no leveling system can fully hide.
- Back-buttering is required — comb thinset onto both the substrate and the back of each tile to guarantee full coverage.
- Medium-bed mortar is recommended — standard thinset shrinks under large tiles and can leave hollow spots. Products like Mapei Granirapid or Laticrete 255 MultiMax are formulated for this use.
- A clip-and-wedge leveling system is non-negotiable — Raimondi, Tuscan Leveling System, and Peygran are reliable options.
- Two-person handling is often needed for tiles 24×48 and larger — the weight and flex risk cracking on the way to the floor.
- Longer cure time before grouting — wait at least 72 hours before grouting large-format porcelain or stone.
In Greater Boston, large-format tile is popular in open-plan kitchens and master bathrooms. The freeze-thaw cycle here also matters for any large-format tile in mudrooms or entryways with exterior exposure — use a freeze-thaw-rated porcelain and a flexible modified thinset to handle seasonal movement.
Boston-Specific Tile Installation Considerations
Greater Boston homes present challenges that most national tile guides do not address. These are the conditions we deal with on every project.
- Freeze-thaw cycles: Any tile near exterior walls, mudrooms, or unheated spaces needs a freeze-thaw-rated porcelain (look for a snowflake symbol on the tile rating). Standard ceramic or natural stone can crack when moisture in the substrate freezes and expands.
- Pre-1950 board subfloors: Colonial, Victorian, and triple-decker construction typically has 1×6 diagonal board subfloors. These need a 3/4" plywood overlay before backer board to meet deflection requirements. Skipping this step is the most common cause of cracked grout in older Boston homes.
- High humidity in older basements: Moisture vapor from concrete slabs in older Boston homes can break down thinset adhesion over time. Use a vapor-reducing membrane or an epoxy thinset primer on suspect slabs before tiling.
- Local building codes: Massachusetts State Building Code (based on the IBC) requires a waterproof pan liner or approved membrane in all shower enclosures. DIY work that skips this step can create issues at resale inspection.
- Lead paint in pre-1978 homes: Demolition work that disturbs walls near tile areas may expose lead paint. Massachusetts law requires lead-safe work practices in homes built before 1978 if children under 6 live there.
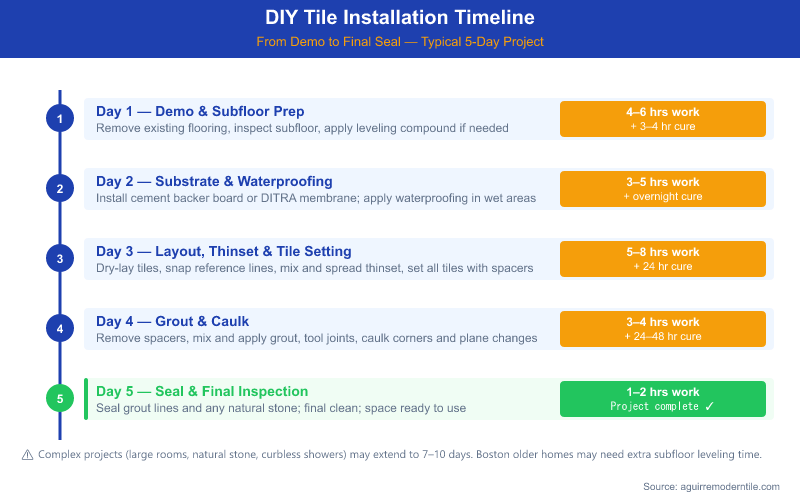
Tile Installation Timeline: From Demo to Final Seal
One of the most common questions we hear is how long the full process takes. Here is a realistic timeline for a standard 50–80 sq ft bathroom floor tile installation how to project.
Phase | Task | Typical Time |
|---|---|---|
Day 1 | Demo existing flooring, subfloor prep and leveling compound | 4–6 hours + 3–4 hour cure |
Day 2 | Install backer board or DITRA, waterproofing membrane (wet areas) | 3–5 hours + overnight cure |
Day 3 | Layout planning, tile setting | 4–8 hours |
Day 4 | Thinset cure (no walking on tile) | 24–48 hours minimum |
Day 5 | Grouting, caulking corners | 2–4 hours |
Day 6–7 | Grout cure, sealing grout and stone, silicone caulk cure | 24–72 hours before use |
Shower builds take longer — typically 5–10 days total — because waterproofing membranes need full cure time before tile goes on, and the finished shower should not be used for at least 72 hours after final sealing. In cold or humid conditions (common in Boston winters and summers), add 24–48 hours to thinset and grout cure times.
Learning Resources and Tile Installation Training
Hands-on learning accelerates skill faster than reading alone. These resources are worth your time before you start a large project.
Certifications and Formal Training
The Ceramic Tile Education Foundation (CTEF) offers the Certified Tile Installer (CTI) program — the industry's most recognized credential for professional tile setters. The test includes a written exam and a hands-on skills assessment. If you are considering tile work as a trade or side business, this certification signals quality to customers. Visit ctef.com for exam schedules and requirements.
The National Tile Contractors Association (NTCA) offers apprenticeship programs and training workshops through regional chapters. Their NTCA Five-Star Contractor program identifies top-tier installers nationally. For homeowners learning on their own, the NTCA reference manual is the most thorough technical guide available.
YouTube Channels Worth Watching
- Tile Coach (Jeff Vargson): CTEF-certified installer. Detailed technique breakdowns, honest about mistakes.
- Schluter Systems: Official channel with product-specific installation guides including DITRA, Kerdi, and transition profiles.
- Roger Wakefield: Covers plumbing and tile together — useful for shower and bathroom projects.
- The Tile Shop: Design-focused but includes installation walkthroughs for beginners.
Common DIY Tile Mistakes to Avoid
Across more than 500 completed tile projects in Greater Boston, we have repaired a lot of failed DIY work. These are the mistakes we see most often.
- Skipping subfloor prep: The most common and most expensive mistake. Lippage and cracked grout usually trace back here.
- Using the wrong trowel size: Too-small notches create hollow tiles that crack underfoot. Check coverage every time.
- Not using a leveling system: Any tile longer than 12" needs a clip-and-wedge leveling system or lippage is almost guaranteed.
- Grouting too soon: Wait a full 24 hours (minimum) after setting tile before grouting. In cold or humid conditions, wait 48–72 hours.
- Using too much water when cleaning grout: Dilutes the grout, weakens the joints, and causes white efflorescence haze.
- Grouting corners and changes in plane: Use silicone caulk at all inside corners, not grout. Grout cracks here every time.
- No waterproofing in wet areas: Backer board alone is not waterproof. You need a membrane in every shower or tub surround.
- Buying too little tile: Order 10% extra for straight lay, 15% for diagonal. Running short mid-project and finding the tile discontinued is a nightmare.
- Ignoring cure times: Walking on tile before thinset cures shifts tiles and breaks the bond. Stay off it for 24 hours.
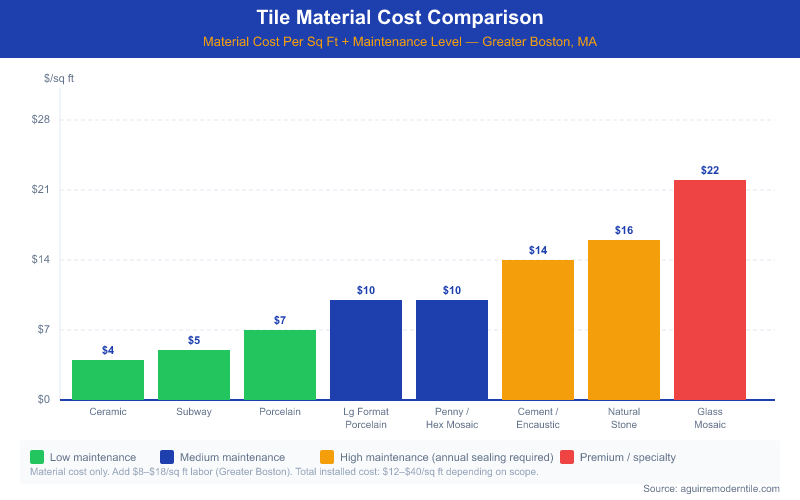
Is DIY Tile Installation Worth It? Cost Comparison
DIY tile installation can save money on labor — but the savings depend heavily on project size, tile type, and your skill level.
Based on current Greater Boston rates (as of 2026 pricing), professional tile installation labor typically ranges from $8–$15 per square foot for standard ceramic and porcelain tile. Complex patterns, large-format tile, or natural stone push labor to roughly $15–$25 per square foot. A 50 sq ft bathroom floor carries approximately $400–$750 in labor costs from a professional installer. That is a real saving if you do the work yourself and do it right.
The risk is rework. A failed DIY tile job can cost as much to fix as it would have cost to install professionally — sometimes more, if demolition and subfloor repair are needed. Homeowners who skip waterproofing in showers often end up paying $3,000–$8,000 for a full teardown and redo (based on current Greater Boston contractor rates). For shower projects, the stakes are high enough that we recommend hiring a professional installer or at minimum getting a professional assessment before you tile.
When to Stop DIY and Call a Professional Tile Installer
Some tile jobs are genuinely DIY-friendly. Others are not, and knowing the difference saves you money and headaches.
DIY Is Reasonable For:
- Small bathroom floors under 80 sq ft with standard 12×12 or 12×24 porcelain tile
- Kitchen backsplash tile over drywall in a dry area
- Laundry room or mudroom floor with simple straight-lay pattern
- Entryway tile over a solid, flat, level concrete slab
Call a Professional For:
- Shower and tub surround tile: Waterproofing failures here cause structural damage. One mistake costs more than the whole professional job.
- Large-format tile (24×48, 32×32, or larger): Requires specialized handling, back-buttering, leveling systems, and experience to avoid lippage.
- Radiant heat systems: Electric heating cables embedded in thinset must be laid without overlapping and monitored during installation. Damaging a heating element means tearing out finished tile.
- Complex patterns (herringbone, chevron, Versailles): Require precise layout planning and more cuts — small errors multiply across the pattern.
- Natural stone (marble, travertine, slate): Requires a stiffer substrate, specific thinset, careful sealing, and careful handling to avoid cracking.
- Structural subfloor issues: If your subfloor is rotted, springy, or severely out of level, a professional needs to assess and repair it before tile goes down.
- Older Greater Boston homes with board subfloors: Pre-1950 construction often has 1×6 board subfloors that need plywood overlay and deflection assessment before tile.
Pro Tip: A professional consultation before you start a DIY project is almost always worth it. We regularly help homeowners assess their subfloor, choose the right materials, and plan their layout — even for jobs they plan to complete themselves. That 30-minute conversation can prevent a 3-day teardown.
For a full cost breakdown by room type and a detailed comparison of DIY vs. professional installation, see the Tile Installation Complete Guide. For shower and bathroom tile, the complexity of waterproofing and slope work is the reason most experienced DIYers in Greater Boston still hire out shower tile while tackling bathroom floors themselves. That is a smart division of risk.
Have questions about your specific tile installation how to project — bathroom floor, kitchen backsplash, or full shower build? Request a free tile installation estimate from Aguirre Modern Tile. Christian Aguirre and his team have completed over 500 porcelain, ceramic, and natural stone tile projects across Greater Boston. Tell us the room, the tile type, and your timeline — we will get back to you the same day.