12x24 tile installation patterns Complete Guide — this is your deep-dive reference for every layout option, from simple stacked grids to angled herringbone.
12x24 tile installation patterns are the layout orientations used to set rectangular large-format tiles on floors, walls, and specialty surfaces. The most common options include straight stacked, 1/3 offset, 50% offset (brick joint), herringbone, and diagonal — each with different visual effects, waste factors, and skill requirements. Based on our 15+ years of tile installation experience in the Greater Boston area, the 1/3 offset is the safest and most popular choice for 12x24 porcelain on floors, while stacked vertical is the top pick for shower walls.
Here are 8 things every homeowner should know before choosing a 12x24 tile pattern for their next project.
1. Popular Tile Installation Patterns — The Full Overview
Tile installation patterns determine how tiles are positioned relative to each other and the room's geometry. The right pattern changes the entire feel of a space — and the wrong one can make a room look smaller or off-balance.
The six most common patterns used in residential tile installation are:
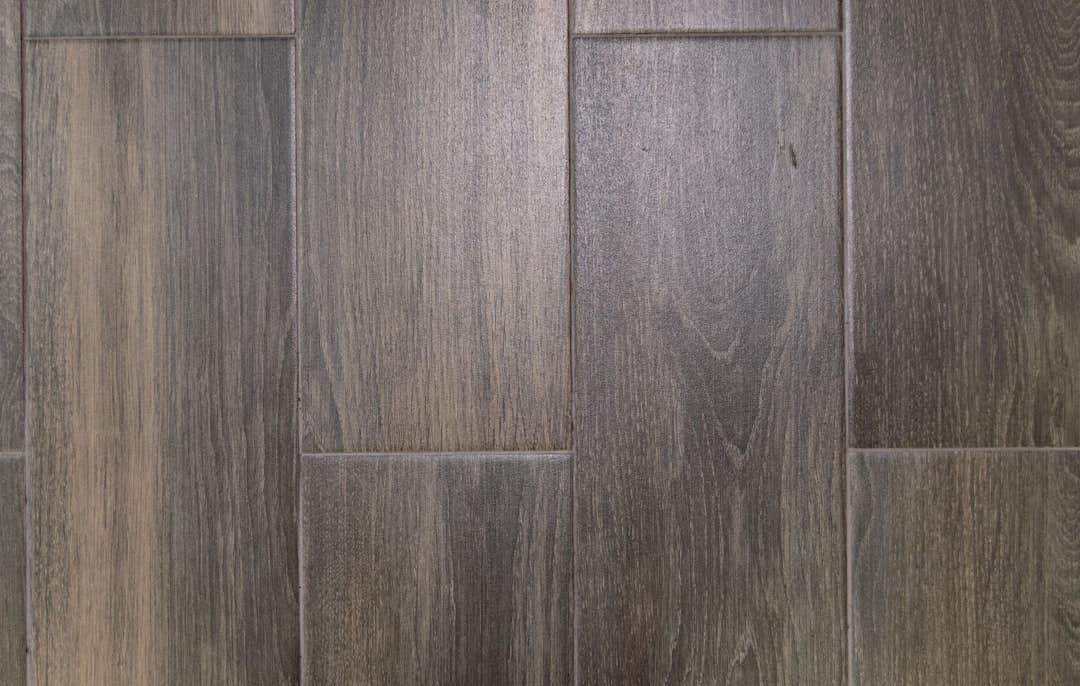
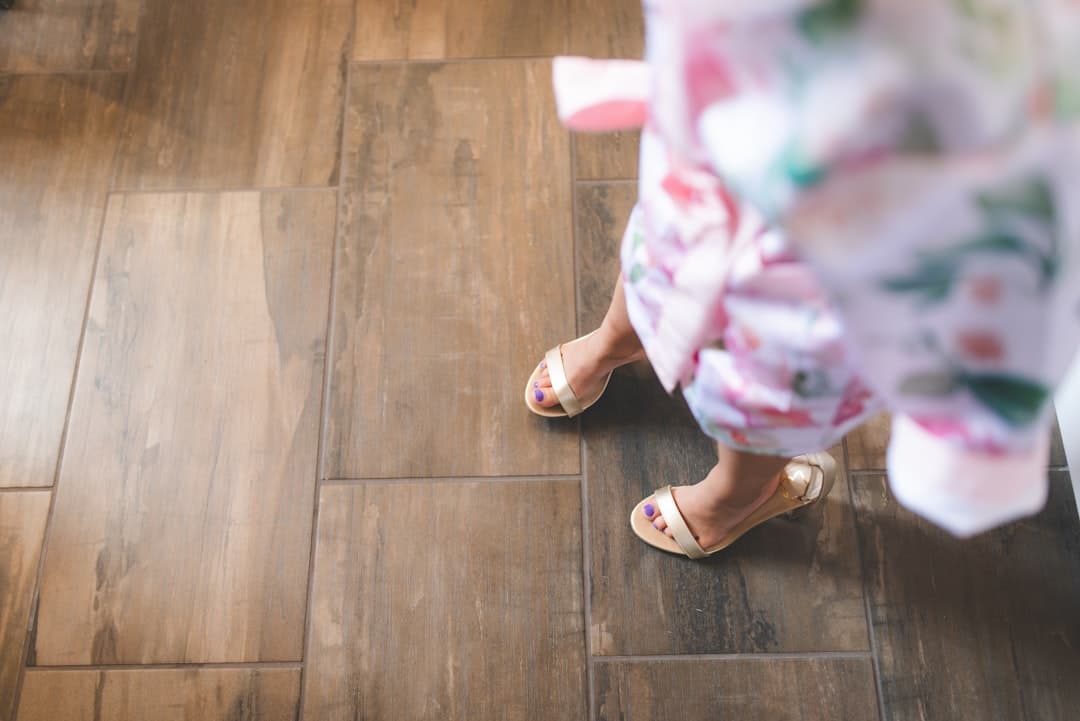
- Straight lay (stacked/grid): Tiles align on both horizontal and vertical axes. Clean, modern, minimal cuts. Easiest pattern to install. Works on floors and walls.
- Offset/brick joint (50% offset): Each row shifts by half a tile length. Classic look — similar to brick laying. Not recommended for 12x24 tiles due to lippage risk (see Section 2).
- 1/3 offset: Each row shifts by one-third of the tile length. The TCNA (Tile Council of North America) recommends this layout for tiles with a length-to-width ratio greater than 2:1, like 12x24. It reduces the chance of visible tile warpage at joints.
- Herringbone: Tiles set at 45° or 90° angles in a V-shaped zigzag. High visual impact. Adds 15–20% material waste from angled cuts. Best for accent walls and entryways.
- Diagonal (45°): Entire floor or wall set at a 45° angle to the room's walls. Makes small rooms feel larger. High waste — expect 10–15% overage. Requires a skilled installer.
- Basket weave: Pairs of tiles alternate direction to create a woven look. More common with smaller tiles (4x8 or 2x4). Rarely used with 12x24 due to proportion issues.
- Chevron: Similar to herringbone but tiles are cut at an angle so the ends meet in a straight line. Requires specialty-cut tiles or precision cuts on every piece. High skill level required.
Every pattern above has different waste factors, labor requirements, and visual effects. Your choice affects both cost and final look — so pick intentionally, not randomly.
Pattern | Waste Factor | Skill Level | Best Use |
|---|---|---|---|
Straight lay / grid | ~5% | Beginner | Floors, walls, large rooms |
1/3 offset | 8–10% | Beginner–Intermediate | Floors, bathrooms, kitchens |
50% offset (brick joint) | 8–10% | Intermediate | Floors (smaller tiles only) |
Herringbone (90°) | 15–20% | Advanced | Accent walls, entryways |
Diagonal (45°) | 10–15% | Advanced | Small rooms, foyers |
Chevron | 20–25% | Expert | Feature walls, backsplashes |
Across 500+ completed projects in Greater Boston, we've seen homeowners consistently underestimate waste. Always buy at least the stated waste percentage above in extra tile — plus one extra box for future repairs.
2. 12x24 Tile Layout Options — Choosing the Right Offset
The 12x24 tile is the most popular large-format residential tile size in the U.S. today. Its 2:1 length-to-width ratio creates specific layout challenges that smaller tiles don't have.
Why 50% Offset Is Risky for 12x24 Tiles
Lippage is the visible height difference between two adjacent tiles at a grout joint. According to TCNA installation standards, tiles with a length-to-width ratio greater than 2:1 should never be installed at 50% offset without special precautions. Large-format porcelain tiles have natural warpage (bow) — typically 1/8 inch or less per ANSI A137.1 standards. At 50% offset, that bow lands directly at the midpoint of the adjacent tile, maximizing lippage. The result is a wavy, uneven surface that catches light badly and is a trip hazard.
Here's what TCNA recommends for 12x24 offset layouts:
- Maximum offset: 33% (one-third of the tile length) for tiles with a 2:1 or greater ratio
- Grout joint minimum: 1/8 inch for rectified tiles; 3/16 inch for non-rectified
- Floor flatness: No more than 1/8 inch variation in 10 feet before tile is set
- Thinset mortar: Large-and-heavy-tile (LHT) mortar required — Mapei Ultraflex LFT or Laticrete 254 Platinum are the go-to choices for 12x24 porcelain
How to Snap Layout Lines for a 1/3 Offset
The 1/3 offset is straightforward once you know the math. For a 12x24 tile, one-third of the 24-inch length is 8 inches. Here's how to set your layout lines:
- Find the center of the room and snap a chalk line parallel to the longest wall.
- Snap a perpendicular line to create a true 90° starting point.
- Dry-lay the first row with 8-inch offsets marked on the floor.
- Snap additional parallel lines every 8 inches to guide each row's starting position.
- Check your layout against both walls before mixing any mortar.
This method keeps every row consistent without measuring from scratch each time. It also lets you spot awkward cuts at the walls before you've committed to the layout.
Room-by-Room 12x24 Layout Recommendations
- Master bathroom floor: 1/3 offset, horizontal orientation. Elongates the room and minimizes visible seams.
- Kitchen floor: Straight stacked or 1/3 offset. Straight is easier to keep clean around cabinets and islands.
- Shower floor: Skip 12x24 — use mosaic or small-format shower floor tiles for better slope drainage and slip resistance.
- Hallway or entryway: Herringbone or diagonal for visual interest in a narrow space.
- Basement floor: Straight stacked — easiest to work with on potentially uneven concrete slabs. See New England-specific notes in Section 6.
- Shower walls: Vertical stacked for a tall, modern look. Horizontal offset for a traditional spa feel.
Planning a bathroom remodel and not sure which pattern fits your space? Send us photos of your bathroom for a free pattern recommendation and same-day quote — we serve all of Greater Boston including Cambridge, Newton, Brookline, and the South Shore.
3. 24x48 and Large Format Tile Patterns
Large format tiles — anything 15 inches or larger on the short side — follow stricter installation rules than standard sizes. The 24x48 format is the fastest-growing residential tile size as of 2026, especially in open-plan bathrooms and living areas.
Pattern options for 24x48 tiles are limited by physics and substrate requirements:
- Stacked/grid: The only reliably safe pattern for 24x48 porcelain slabs. Grout joints should be 3/16 to 1/4 inch minimum to allow for movement and hide any lippage.
- Minimal offset (10–20%): Some experienced installers use a slight offset to break up the grid look. Go beyond 20% and lippage risk jumps sharply.
- Herringbone: Technically possible but rarely practical. Each tile needs to be cut at precise angles, waste exceeds 25–30%, and the visual scale of 24x48 tiles makes herringbone look heavy and disproportionate in most rooms.
Substrate and Mortar Requirements for Large Format Tiles
Large format tiles demand a flat subfloor. The TCNA standard tightens from 1/8 inch in 10 feet to 1/8 inch in 10 feet AND 1/16 inch in 24 inches for tiles with any side longer than 15 inches. In Greater Boston's older housing stock, this often means self-leveling underlayment is required before any tile goes down.
- Self-leveling compound: Mapei Ultraplan Eco or Laticrete NXT Level — cost approximately $1.50–$2.50 per square foot installed in Greater Boston (as of 2026 pricing)
- LHT mortar required: Standard thinset doesn't provide enough coverage under large tiles. Use mortar that meets ANSI A118.4 or A118.11 for large-and-heavy tile.
- Back-buttering: Every 24x48 tile must be back-buttered with a flat trowel before setting. This ensures 95%+ mortar coverage as required by TCNA for wet areas.
- Tile leveling systems: Essential at this size. Raimondi Lev-Rite, Tuscan Seam Clip, and Lippert Cyclone Clips are all solid choices. Clips and wedges add approximately $0.30–$0.50 per square foot to material cost.
4. Herringbone and Chevron Installation
Herringbone is the most dramatic pattern available for 12x24 tiles. When done correctly, it transforms a basic tile into a statement floor or wall. When done wrong, it's an expensive mess to fix.
What Is Herringbone Pattern?
Herringbone is a V-shaped zigzag tile arrangement where each tile is set perpendicular to its neighbors. With 12x24 tiles, the classic version uses 90° herringbone — tiles set at right angles to each other, with the end of one tile meeting the middle of the next. This creates a bold, directional look that draws the eye down a hallway or across a feature wall.
Center Line Method for Herringbone Layout
- Find the room's center point and snap a diagonal line at 45° to the walls.
- Set the first tile with its long edge on the centerline, angled at 45°.
- Place the second tile perpendicular to the first, touching at the corner.
- Work outward from the center in both directions, maintaining consistent spacing.
- Cut perimeter tiles last — use a quality wet saw with a diamond blade rated for porcelain.
A wet saw is non-negotiable for herringbone with 12x24 porcelain. Snap cutters crack large-format tiles at the score line and can't make angled cuts. Expect to use a 10-inch or larger diamond blade wet saw — rental cost is approximately $60–$80 per day in Greater Boston.
Herringbone Waste and Difficulty
- Waste factor: 15–20% for standard 90° herringbone with 12x24 tiles
- Timeline impact: A professional installer can typically set 150–200 sq ft per day on straight lay. Herringbone drops that to 80–120 sq ft per day due to cut complexity.
- Grout joint: Keep at 1/8 inch for a tight, seamless look. Herringbone with wide grout joints loses its sharpness.
- Best grout color: Match or near-match to tile color. Contrasting grout in herringbone emphasizes every joint — which can look busy with 12x24 tiles.
Chevron vs. Herringbone: What's the Difference?
- Herringbone: Standard rectangular tiles. Ends meet at the sides of adjacent tiles. Achievable with any 12x24 tile off the shelf.
- Chevron: Tile ends are cut at an angle (typically 45°) so they form a perfect V-point. Requires either specialty-cut tiles or precise angle cuts on every single tile. Much higher waste and labor cost — not recommended for budget-conscious projects.
For most homeowners in Greater Boston, herringbone gives you the dramatic look of chevron at a fraction of the complexity. For shower walls and feature walls, it's one of our most-requested patterns at Aguirre Modern Tile.
5. Wall Tile Installation Patterns
Wall tile follows different rules than floor tile. Gravity, grout joints, and viewing distance all change how a pattern reads on a vertical surface. The same tile that looks clean on a floor can look completely different stood upright on a wall.
Vertical vs. Horizontal Orientation
With 12x24 tiles, orientation is one of the biggest decisions you'll make:
- Horizontal (landscape): The 24-inch dimension runs across the wall. Makes ceilings feel lower and rooms feel wider. Classic spa bathroom look. Most common for shower surrounds.
- Vertical (portrait): The 24-inch dimension runs floor to ceiling. Makes ceilings feel taller. Works best in rooms with 8-foot or lower ceilings. Very popular in contemporary Boston condo renovations.
Wall Pattern Options for 12x24 Tiles
- Stacked vertical: Clean, modern, no offset. Requires perfectly plumb walls — any deviation shows immediately in a stacked pattern.
- Horizontal offset (1/3 brick): Most forgiving layout for out-of-plumb walls. Creates a relaxed, classic look.
- Herringbone accent wall: Use only on one focal wall — above a vanity, behind a freestanding tub, or as a shower niche back wall. Floor-to-ceiling herringbone on all shower walls gets overwhelming.
- Vertical stacked with horizontal accent band: Mix horizontal and vertical sections using a contrasting tile or different size for a custom designer look.
For a deeper look at shower wall options specifically, see our guide on bathroom tile ideas and design layouts.
Wall Substrate and Waterproofing Considerations
Wall tile doesn't get foot traffic, but moisture is a bigger concern — especially in Boston's humid summers and cold winters. Before any wall tile goes up in a wet area:
- Use cement backer board (Schluter KERDI-BOARD or USG Durock) or a waterproof membrane like Schluter KERDI or Laticrete Hydro Ban
- Tape and seal all seams before tile installation
- Use white epoxy grout in the lower 12 inches of any shower wall — it resists mold far better than sanded grout in wet zones
- Never install 12x24 tile directly over standard drywall in a shower — it will fail within 2–5 years
6. Specialty Surface Tile Installation
Beyond floors and shower walls, tile gets installed on fireplaces, outdoor patios, and ceilings. Each surface adds a new layer of technical challenge. Here's what changes.
Fireplace Tile
- Use heat-rated mortar — standard thinset fails near heat sources. Mapei Kerabond mixed with Keralastic admixture is a reliable choice for fireplace surrounds.
- 12x24 porcelain is popular for fireplace surrounds. Stick to straight stacked or vertical stack — the clean lines complement the fireplace form.
- Keep tile at least 6 inches from the firebox opening — check your local Massachusetts fire code and the fireplace manufacturer's clearance specs.
- Grout joints should be 1/8 to 3/16 inch to allow for thermal expansion and contraction.
Outdoor Tile in New England
Outdoor tile installation in Greater Boston is technically demanding. Freeze-thaw cycles are brutal on improperly installed tile.
- Only use frost-proof porcelain with a water absorption rate below 0.5% — check the tile spec sheet
- Use ANSI A118.4 or A118.11 exterior-rated mortar with polymer additive
- Install over a properly sloped concrete substrate — 1/4 inch per foot minimum slope for drainage
- Use movement joints (Schluter DILEX or similar) every 8–10 feet and at all changes of plane
- Expected tile life on a properly installed Boston-area patio: 20+ years
Greater Boston Regional Considerations
Older New England homes (pre-1980 construction) bring specific challenges that don't appear in national installation guides:
- Basement floors: Moisture vapor from concrete slabs is a real issue in Boston-area basements. Test moisture with a calcium chloride test (ASTM F1869) before tiling. Use a vapor-control membrane like Schluter DITRA or Laticrete Hydro Ban if readings exceed 5 lbs per 1000 sq ft per 24 hours.
- Radiant heat subfloors: 12x24 porcelain works well over radiant heat. Use Schluter DITRA-HEAT or Laticrete SteelHeat — both are rated for in-floor heating systems and provide the uncoupling layer large-format tiles need.
- Old wood subfloors: Many Greater Boston homes have 3/4-inch plywood over 1x6 diagonal subfloor boards — a common 1920s–1950s construction method. This assembly often flexes too much for large-format tile. A second layer of 5/8-inch plywood or cement board may be required before tile installation.
- Permit requirements: Most standard tile installation in Massachusetts does not require a building permit. However, if the scope includes structural subfloor repair, plumbing relocation, or electrical work for heated floors, permits are required. Check with your local building department — requirements vary by municipality in Greater Boston.
7. Tile Design Ideas and Trending Patterns for 2025–2026
Design trends in tile patterns shift, but certain looks have staying power in the Greater Boston market. Based on our project work through 2025 and early 2026, here's what homeowners are choosing most often.
Top Trending 12x24 Tile Looks in Greater Boston
- Large-format matte porcelain in warm concrete tones: Greige (gray-beige) and warm taupe 12x24 tiles in a 1/3 offset. Works in every room. MSI Dimensions Gray and Daltile Stonebridge series are popular mid-range options at $2.50–$5.00 per square foot (as of 2026 pricing).
- Vertical stack in large-format white or light gray: Creates a clean, spa-like feel in master bathrooms. Often paired with a matte black Schluter trim profile for edge detail.
- Two-tone pattern: Main floor in straight-lay 12x24, with a herringbone accent band or inset border. Creates visual interest without the waste of a full herringbone floor.
- Wood-look plank tile in herringbone: 12x24 wood-look porcelain in a herringbone pattern for hallways and mudrooms. Durable, water-resistant, and visually striking. Daltile Emerson Wood and MSI WoodX are durable options.
- Contrasting grout with stacked tile: Dark charcoal grout with white or light gray straight-stacked 12x24 tiles. The pattern becomes the grout grid itself — very graphic and modern.
Grout Color Pairings for 12x24 Patterns
Grout color is often an afterthought — but it changes how a pattern reads more than almost any other factor.
- Match grout to tile: Minimizes the pattern, maximizes the tile surface. Best for veined or textured porcelain where you want the tile to be the star.
- Medium contrast grout: Soft gray grout on white tile. Defines the layout without overwhelming it. Works well with 1/3 offset patterns.
- High contrast grout: Black or dark charcoal grout on white tile. Makes every joint visible — this amplifies a herringbone or stacked pattern dramatically. Only works if your layout lines are perfectly straight.
- Epoxy vs. cement grout: Mapei Ultracolor Plus FA (cement) is the go-to for most 12x24 floor installations. Mapei Kerapoxy or Laticrete SpectraLOCK epoxy grout is worth the premium cost in shower floors and kitchen backsplashes — stain resistance is significantly better.
8. Choosing the Right Pattern for Your Space
Pattern selection should follow a simple decision framework based on three factors: room size, tile size, and your style goals. Here's how to work through it.
The Decision Framework
Step 1 — Measure your room and identify the dominant dimension. Long, narrow rooms (hallways, galley kitchens) benefit from diagonal or herringbone patterns to break up the tunnel effect. Square or nearly square rooms work with almost any pattern.
Step 2 — Match tile size to room size. As a general rule:
- Rooms under 60 sq ft: 12x24 tiles work but can feel heavy. Consider 12x12 or 4x12 for small bathrooms.
- Rooms 60–150 sq ft: 12x24 is ideal. 1/3 offset or stacked.
- Rooms over 150 sq ft: 12x24 or 24x48. Straight lay or minimal offset keeps installation cost down.
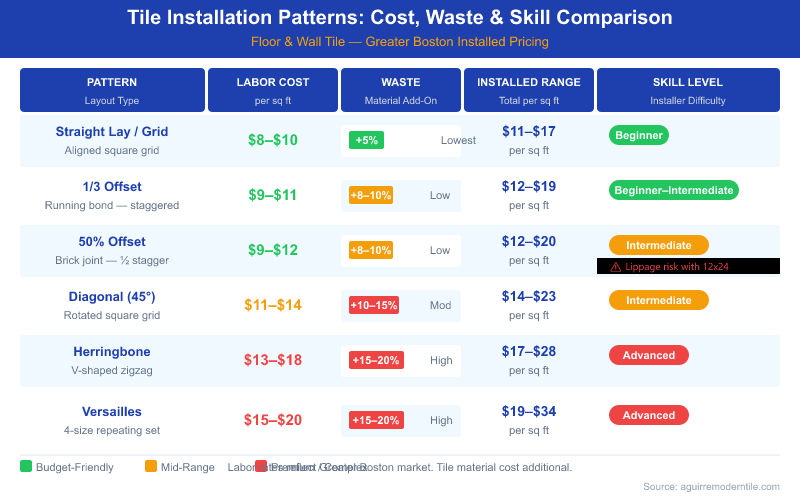
Step 3 — Match pattern to budget. Here's what 12x24 tile installation costs in Greater Boston as of 2026, broken down by pattern complexity:
Pattern | Labor Cost (per sq ft) | Material Waste Add-On | Total Installed Range |
|---|---|---|---|
Straight lay / stacked | $8–$10/sq ft | +5% | $11–$17/sq ft installed |
1/3 offset | $9–$11/sq ft | +8–10% | $12–$19/sq ft installed |
Herringbone (12x24) | $12–$15/sq ft | +15–20% | $15–$24/sq ft installed |
Diagonal (45°) | $11–$14/sq ft | +10–15% | $14–$22/sq ft installed |
Labor rates based on current Greater Boston rates as of 2026. Material costs not included — add $2–$8 per square foot depending on tile selection.
Where to Buy 12x24 Tiles in Greater Boston
- Floor & Decor (Dedham, MA): Best selection for budget to mid-range porcelain. Stock 12x24 options start around $1.50–$3.00 per sq ft.
- Daltile Design Studio (Boston area): Mid-range to premium options. Staff can help with pattern planning and ordering. Prices typically $3–$8 per sq ft.
- MSI Surfaces (regional distributors): Premium large-format options. Most residential orders go through a tile contractor — ask your installer about trade pricing.
- Local tile showrooms (Newton, Brookline, Wellesley): Higher-end curated selections. Many carry exclusive European porcelain not found at big-box stores.
How to Choose a 12x24 Tile Installer in Greater Boston
Not every tile installer is set up to handle large-format tile correctly. Before you hire, ask these questions:
- Do you use a tile leveling system for 12x24 and larger tiles?
- What mortar do you use for large-format porcelain — and is it ANSI A118.4 or A118.11 rated?
- Will you test the subfloor flatness before installation starts?
- Can you show me photos of previous 12x24 tile projects you've completed?
- Are you familiar with TCNA installation guidelines for large-format tile?
If an installer can't answer these confidently, move on. Improper large-format installation leads to lippage, cracked tiles, and failed grout joints — all expensive to fix after the fact.
For help with bathroom tile installation planning or a full project quote in Greater Boston, contact Aguirre Modern Tile. Christian Aguirre and our team have completed 500+ tile installations across Boston, Cambridge, Newton, Brookline, Dedham, and the South Shore. We'll recommend the right 12x24 pattern for your room, give you a straight answer on cost, and back our work with a quality guarantee.
Frequently Asked Questions
What is the best pattern for 12x24 tile on a bathroom floor?▾
What is the 1/3 offset rule for large format tile?▾
How much does 12x24 tile installation cost in Greater Boston?▾
Can you install 12x24 tile in a herringbone pattern?▾
What thinset mortar should I use for 12x24 porcelain tile?▾
Do I need a permit to install tile in Massachusetts?▾
Need Floor Tile Installation?
Send us photos and get a same-day estimate.