Tile Installation Floor: Complete Guide to Getting It Right
Tile installation floor work covers everything from subfloor prep to final sealing. In Greater Boston, professional labor typically runs $7–$15 per square foot, with total project costs ranging from $800 to $10,500+ depending on room size and tile type (as of 2026 pricing). This guide covers concrete slabs, wood subfloors, large-format tile, grouting, and cost benchmarks for local homeowners.
- Subfloor condition is the biggest factor in whether your floor tile lasts 5 years or 50.
- TCNA standards require subfloor flatness within 3/16 inch over 10 feet — required for large-format tile.
- Material costs range from $1–$3/sq ft for ceramic up to $10–$20+/sq ft for natural stone (as of 2026 pricing).
- Order 10–15% extra tile to account for cuts, waste, and future repairs — this is industry standard.
- Uncoupling membranes like Schluter DITRA are required over wood subfloors and strongly recommended over radiant heat systems.
- Professional installation in Greater Boston ranges from $1,500–$6,000+ for most residential floor tile projects, depending on room size and tile type (as of 2026 pricing).
What Is Involved in a Professional Floor Tile Installation?
Professional floor tile installation is a multi-step process that starts with the subfloor and ends with sealing. Unlike a backsplash, floors take constant foot traffic, moisture, and heavy loads. A failed floor tile job means cracked grout, hollow tiles, and expensive repairs — often costing more to fix than the original professional install.
In our 15+ years of experience installing tile across Greater Boston, we've repaired hundreds of DIY floor tile jobs. The most common problems are poor subfloor prep, wrong mortar, and inadequate deflection control. These aren't beginner mistakes — they're skipped steps that even experienced DIYers miss.
Here's what the full process involves:
- Assess and prepare the subfloor (level, repair cracks, check deflection)
- Install backer board or uncoupling membrane
- Dry-fit the tile layout
- Mix and spread thinset mortar
- Set tiles with spacers
- Cut perimeter and obstacle tiles
- Grout and seal
- Install transition strips and edge trim
A 100 sq ft bathroom floor takes a professional crew 2–3 days from demo to grouting. A 300 sq ft kitchen floor typically runs 4–5 days. Larger projects with complex patterns or large-format tile can take a full week or more. These timelines include subfloor prep — the step most DIYers underestimate.
Want to know what your project will cost? Contact us for a free floor tile installation estimate — tell us your room size and tile type, and we'll give you a detailed quote for your Greater Boston project.
Should You DIY or Hire a Professional Tile Installer?
For most floors larger than 80 square feet, hiring a professional is the smarter choice. The cost difference between DIY and professional tile installation is often $5–$8 per square foot in labor. On a 150 sq ft kitchen floor, that's $750–$1,200 in savings — until something goes wrong.
Redo the math after a failed DIY job that needs full demo and reinstall. The savings disappear fast. Professionals bring calibrated tools (laser levels, tile saws, leveling systems), the right mortars for each application, and the knowledge to spot problems before they happen.
Here's a quick comparison of DIY vs. professional tile installation for floors:
Factor | DIY | Professional |
|---|---|---|
Labor cost | $0 (your time) | $7–$15/sq ft (as of 2026 pricing) |
Subfloor prep quality | Often skipped or incomplete | Engineered to TCNA standards |
Lippage risk (large tile) | High without leveling systems | Low — leveling clips used |
Warranty | None | 1–2 years on workmanship (typical) |
Timeline | 2–4x longer | Predictable, professional schedule |
Best for | Small, simple layouts under 50 sq ft | Any floor over 80 sq ft, large-format tile, radiant heat |
How Do You Prepare a Subfloor for Tile Installation?
Subfloor preparation determines whether your tile lasts. The exact steps depend on whether you have a concrete slab or a wood subfloor — both common in Greater Boston homes.
Preparing a Concrete Subfloor
Concrete subfloors need to be clean, flat, and dry before any tile goes down. Skipping prep on concrete is the fastest way to get tile failure — especially in Boston-area basements where moisture is a constant issue.
Step 1: Moisture Testing. Concrete slabs release moisture vapor over time. Excess moisture causes thinset bond failure and grout deterioration. Use a calcium chloride test kit (ASTM F1869) or a relative humidity probe (ASTM F2170) before installing. Most tile manufacturers require moisture emission below 5 lbs per 1,000 sq ft per 24 hours. If your slab exceeds this, apply a moisture barrier like Laticrete Hydro Ban before tiling.
Step 2: Surface Flatness. Per TCNA guidelines, concrete subfloors must be flat within 3/16 inch over 10 feet — or 1/8 inch over 10 feet for grout joints narrower than 1/4 inch. Use a long straightedge to find low and high spots. Fill low spots with a floor-leveling compound like Mapei Ultraplan or Ardex Feather Finish. Grind down high spots with an angle grinder.
Step 3: Crack Repair. Hairline cracks in concrete are common and don't always mean structural failure. Fill them with a flexible crack isolation membrane, or apply a full uncoupling membrane over the entire slab. Active cracks — ones that move — need a structural engineer before tiling.
Step 4: Primer Application. Prime the concrete slab with a latex bonding primer before installing thinset. This improves adhesion and reduces suction, which can cause thinset to dry out too fast. Mapei Primer T and Laticrete 3701 Fortified Mortar Bed Admix are common choices among professional installers.
Preparing a Wood Subfloor for Tile
Wood subfloors are the most common substrate in Greater Boston's older housing stock. Many homes built before 1970 have single-layer plywood or diagonal board sheathing. Both require extra preparation before tile will perform long-term.
The core challenge is deflection — wood flexes under load, and tile cracks when the subfloor moves. Per TCNA standards, wood subfloors must have a deflection rating of L/360 or less. That means a floor spanning 10 feet should deflect no more than 1/3 inch under load. Many older Boston homes don't meet this standard without reinforcement.
Install 1/2 inch cement backer board (HardieBacker or Durock) over plywood that is at least 3/4 inch thick. The combined thickness of plywood plus backer board should be at least 1-1/4 inches. Fasten backer board with 1-1/4 inch ribbed screws every 6 inches along edges and 8 inches in the field. Offset the backer board joints from the plywood joints by at least 2 inches.
Also apply a thin layer of thinset mortar between the plywood and backer board. This fills voids and prevents movement. Tape all backer board joints with fiberglass mesh tape and thinset before tiling. Skipping this step leads to cracked grout lines at panel seams.
Homes with diagonal 1x board sheathing — very common in pre-1950 Greater Boston construction — need a full layer of 3/4 inch plywood added before backer board. This brings the subfloor to adequate stiffness. Subfloor reinforcement for this type typically runs $3–$6 per square foot in Greater Boston, not including the tile work itself (as of 2026 pricing).

What Type of Floor Tile Is Best for Your Home?
The best floor tile depends on your room, traffic level, and budget. Porcelain is the most popular choice for Greater Boston homes. Natural stone is more expensive but offers a high-end look. Here's how the main options compare:
Tile Type | Best Rooms | Material Cost (as of 2026) | Durability | Maintenance |
|---|---|---|---|---|
Ceramic (e.g., Daltile Fidenza) | Bathrooms, laundry rooms | $1–$3/sq ft | Moderate | Low — easy to clean |
Porcelain (e.g., MSI Montclaire) | Kitchens, entryways, living rooms | $3–$8/sq ft | High | Low — stain-resistant |
Travertine (natural stone) | Entryways, bathrooms | $8–$15/sq ft | Moderate | High — requires sealing |
Slate (natural stone) | Mudrooms, basements | $8–$14/sq ft | High | Moderate — seal annually |
Marble (e.g., MSI Calacatta Gold) | Master baths, formal spaces | $10–$20+/sq ft | Moderate | High — etches, requires sealing |
Large-format porcelain slab (e.g., Florim) | Open-plan kitchens, living areas | $6–$15/sq ft | Very High | Low — fewer grout lines |
For most Greater Boston homeowners, porcelain tile hits the best balance of durability, price, and low maintenance. Unglazed natural stone (slate, travertine, limestone) requires a full surface sealer before grouting to prevent staining. If you're unsure which tile fits your project, ask our team for a tile recommendation — we'll match you to the right product for your subfloor, budget, and room type.
What Is the Step-by-Step Process for Installing Floor Tile?
A professional floor tile installation follows a defined sequence. Skipping or rushing any step — especially subfloor prep — leads to tile failure. Here's the full process used on every tile installation floor project we complete in Greater Boston.
Step 1: Plan the Layout
Snap chalk lines from the midpoints of opposite walls to find the room's center point. Adjust the layout so you don't end up with slivers of tile — less than half a tile width — at any wall. A dry-fit run lets you test this before committing to mortar. If you end up with a cut smaller than half a tile at the walls, shift your starting point by half a tile width. This is called balancing the layout.
Step 2: Dry-Fit the Tiles
Lay full tiles out from the center point in both directions without adhesive. Use tile spacers to simulate your grout joints. For tiles up to 12x12, a 1/8 inch spacer is standard. For 12x24 tiles, use 3/16 inch. For 24x48 large-format tiles, use 1/4 inch or wider joints to accommodate slight size variation between tiles.
Step 3: Apply Thinset and Set Tiles
Spread thinset with the correct notched trowel for your tile size. Back-butter each tile 15 inches or larger before setting it. Press tiles firmly into the mortar and twist slightly to ensure full contact. Use a leveling system (such as Raimondi or LASH clips) for large-format tile to prevent lippage. Check alignment with a straightedge as you go.
Step 4: Cut Perimeter and Obstacle Tiles
Use a wet saw to cut tiles at walls, doorways, and around obstacles like toilets and floor vents. Score-and-snap cutters work for straight cuts on ceramic tile but not for porcelain or stone. Always wear eye protection and follow tool safety guidelines.
Step 5: Allow Thinset to Cure
Wait at least 24 hours before walking on the tile. Wait 48–72 hours before grouting. Curing times vary by mortar type and ambient temperature — follow the manufacturer's instructions for your specific product.
Step 6: Grout and Seal
Apply grout with a rubber float, working diagonally across the joints. Remove excess with a damp sponge in circular motions. Avoid excess water — it dilutes the grout and weakens it. Wait 72 hours after grouting before applying penetrating sealer to sanded grout joints. Reapply sealer every 1–3 years depending on traffic.
Step 7: Install Trim and Transitions
Install Schluter Jolly, Schiene, or similar edge trim at doorways and transitions to other flooring. These protect tile edges and create a finished look. Caulk expansion joints at walls and changes in plane — never use grout in these locations.
Underlayment and Backer Board: Which Should You Use?
The right underlayment depends on your subfloor type, tile size, and whether you have radiant heat. Here are the main options used by professional installers today:
Product | Best For | Thickness | Approx. Cost Installed (as of 2026) |
|---|---|---|---|
HardieBacker 500 Cement Board | Most wood subfloor tile projects | 1/4" or 1/2" | $1.50–$2.50/sq ft |
USG Durock Cement Board | Wet areas, high-traffic floors | 1/2" | $1.50–$2.50/sq ft |
Schluter DITRA Uncoupling Membrane | Wood subfloors, radiant heat, problematic slabs | 1/8" | $2.50–$4.00/sq ft |
Schluter DITRA-HEAT | Radiant heat tile floors | 1/4" | $4.00–$7.00/sq ft (with heat cable) |
Wedi Board (XPS Foam) | Weight-sensitive applications, wet rooms | 1/2"–2" | $3.00–$5.00/sq ft |
Schluter DITRA is a polyethylene uncoupling membrane with a grid of square cavities on one side and a fleece backing on the other. It decouples the tile from the subfloor so the subfloor can move slightly without stressing the tile. DITRA is especially useful over wood subfloors in older New England homes. Installation requires unmodified thinset on both sides of the membrane — this is a common DIY mistake. See our guide on bathroom tile installation for more on DITRA in wet area applications.
Large Format Floor Tile: What's Different?
Large-format tiles — typically 12x24 inches and larger, up to 24x48 or even 48x48 slabs — require a higher skill level to install correctly. They're popular in Greater Boston kitchen and living room renovations, but they amplify every subfloor flaw.
Lippage Control
Lippage is when the edge of one tile sits higher than the adjacent tile. It's visible, creates a tripping hazard, and signals poor installation. According to TCNA guidelines, the maximum acceptable lippage for tiles with a grout joint of 1/16 inch or less is 1/32 inch. For larger joints, up to 1/16 inch is acceptable. Large tiles make any subfloor variation more visible, which is why flatness prep is non-negotiable.
Professional installers use tile leveling clip systems — such as Raimondi, LASH, or Spin Doctor — to hold adjacent tiles at the same height while thinset cures. Clips go under tile edges. A wedge or cap is tightened to pull them flush. After the thinset cures, the clip tab snaps off with a rubber mallet. These systems add time but eliminate lippage on large-format tile.
Mortar Selection for Large-Format Tile
Large tiles require medium-bed mortar or a purpose-made large-format tile mortar — not standard thinset. Products like Mapei Ultraflex LFT or Laticrete 254 Platinum are formulated for tiles larger than 15 inches in any dimension. They allow a thicker mortar bed (up to 3/4 inch) without slumping and provide better bond strength.
Back-buttering is required for tiles 15 inches or larger. Apply a thin layer of thinset to the back of each tile before setting it. This ensures full mortar coverage of at least 95% on the tile back — a TCNA requirement for wet areas and exterior applications. Insufficient coverage leads to hollow spots and cracked tiles.
Thinset Coverage Rates
A 50 lb bag of thinset covers approximately:
- 40–50 sq ft with a 3/16 inch V-notch trowel (small mosaic tiles)
- 30–40 sq ft with a 1/4 x 3/8 inch square-notch trowel (standard floor tiles)
- 20–30 sq ft with a 1/2 x 1/2 inch square-notch trowel (large-format tiles)
Back-buttering reduces coverage rates by roughly 20–30%. Plan your material order accordingly.
How Do You Care for and Maintain Newly Installed Floor Tile?
Proper care after installation protects your investment and extends the life of the tile and grout. Follow these guidelines in the first few weeks — and as a long-term maintenance routine.
- First 24 hours: No foot traffic. Let thinset cure fully before loading the floor.
- First 72 hours: No grouting. Wait until thinset has reached full strength.
- First week after grouting: No wet mopping. Use a dry mop or light damp cloth only. Sanded grout takes 28 days to fully cure.
- Sealing: Apply a penetrating grout sealer at least 72 hours after grouting. Reapply every 1–3 years based on traffic and cleaning frequency.
- Natural stone tile: Seal the tile surface before grouting to prevent grout staining the face. Reseal annually for high-traffic areas.
- Epoxy and urethane grout: No sealer required. Wipe spills promptly — these grouts are stain-resistant but not stain-proof.
- Routine cleaning: Use a pH-neutral tile cleaner. Avoid vinegar, bleach, or acidic cleaners on natural stone or unsanded grout — they cause etching and discoloration.
- Grout inspection: Check grout lines annually for cracks or missing sections. Regrout damaged areas promptly to prevent water infiltration under the tile.
Floor Tile Grouting and Sealing: Getting the Finish Right
Grout locks the tile assembly together and affects the finished look of the floor. Choosing the wrong grout type causes cracking, staining, and early failure.
Which Grout Type Should You Use?
- Unsanded grout: Use for joints 1/8 inch or narrower. Smooth texture. Works well with polished stone and glass tile.
- Sanded grout: Use for joints 1/8 inch and wider. Sand prevents shrinkage cracking in wider joints. Required for most floor tile applications.
- Epoxy grout (e.g., Mapei Kerapoxy, Laticrete SpectraLOCK): Chemical-resistant, stain-proof, and durable. Best for commercial floors and kitchens. Requires fast application and cleanup before it sets.
- Urethane grout (e.g., Bostik TruColor): Pre-mixed, stain-resistant, and flexible. Good for residential floors where low maintenance matters.
Grout Application and Cure Time
Apply grout with a rubber float, working diagonally across the joints. Remove excess grout with a damp sponge in circular motions. Don't use too much water — it dilutes the grout and weakens it. Sanded grout from brands like Mapei, Laticrete, and Custom Building Products reaches initial set in 24–72 hours but takes 28 days to fully cure. Avoid heavy foot traffic and wet mopping for the first week.
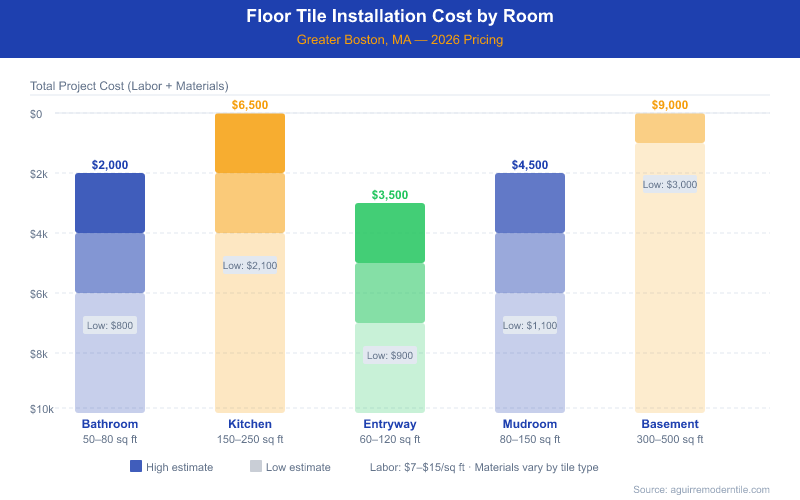
How Much Does Floor Tile Installation Cost in Greater Boston?
Based on current Greater Boston rates, here's what homeowners typically spend on professional tile installation floor projects (as of 2026 pricing). These figures include subfloor prep, backer board or membrane, thinset, tile setting, grouting, and sealing.
Room Type | Typical Size | Labor Only (est.) | Materials (est.) | Total Range |
|---|---|---|---|---|
Bathroom Floor | 50–80 sq ft | $600–$1,200 | $200–$800 | $800–$2,000 |
Kitchen Floor | 150–250 sq ft | $1,500–$3,500 | $600–$3,000 | $2,100–$6,500 |
Entryway / Mudroom | 40–80 sq ft | $500–$1,000 | $150–$600 | $650–$1,600 |
Basement Floor | 300–600 sq ft | $2,500–$6,000 | $900–$4,500 | $3,400–$10,500 |
These totals do not include demo of existing flooring. Add $1–$3/sq ft for vinyl or linoleum removal (as of 2026 pricing). Subfloor structural repairs are also billed separately. Tile material costs vary: ceramic runs $1–$3/sq ft, porcelain $3–$8/sq ft, and natural stone $8–$20+/sq ft (material only, as of 2026).
No competitor in our market breaks down professional vs. DIY cost comparisons for Greater Boston. These figures come from our own project history across 500+ completed installations in the area. They reflect real labor rates — not national averages.
How Long Does Floor Tile Installation Take?
Timeline depends on room size, subfloor condition, tile type, and pattern complexity. Here are realistic estimates based on current Greater Boston project experience (as of 2026):
- Small bathroom (50–80 sq ft): 2–3 days from demo to grouting
- Kitchen floor (150–250 sq ft): 4–5 days including subfloor prep
- Large open-plan area (300+ sq ft): 5–7 days or more for complex patterns
- Basement floor (300–600 sq ft): 5–10 days depending on concrete prep needs
- Add 1–2 days for subfloor reinforcement on older wood-frame homes
- Add 1 day for radiant heat cable installation under DITRA-HEAT membrane
These timelines include subfloor prep. Most homeowners underestimate this phase. A floor that looks structurally sound can still need leveling, crack repair, or membrane installation before the first tile goes down.
How Do You Find a Qualified Floor Tile Installer?
In Massachusetts, tile contractors don't need a state tile-specific license. But they should hold a valid Home Improvement Contractor (HIC) registration through the Massachusetts Office of Consumer Affairs and Business Regulation. This registration is required for any residential improvement work over $1,000 and protects homeowners if something goes wrong.
When vetting a tile installer, ask for:
- HIC registration number — verify it through the Massachusetts OCABR contractor lookup tool
- Proof of general liability insurance — minimum $1 million coverage
- References from 3+ recent floor tile projects in the Greater Boston area
- A written contract that specifies tile brand, material quantities, prep work included, and warranty terms
- Labor warranty — most reputable installers offer 1–2 years on workmanship
Be cautious of quotes that don't include subfloor prep. That's where most of the work happens. Contractors who omit it from their scope are setting you up for failure. Across 500+ projects in Greater Boston, the jobs we've been called to repair almost always had one thing in common: someone cut corners on prep.
Most floor tile replacements don't require a building permit in Massachusetts. However, if you're altering the subfloor structure, adding radiant heat, or changing room layout, a permit may be required. Your contractor should advise you on this before work begins.
For detailed guidance on project budgeting, see our post on tile installation cost, which covers Greater Boston pricing and what's included in a professional quote. For more on pattern planning and tile sizing, see our guide on how to tile a floor.
At Aguirre Modern Tile, we've installed tile on everything from 1880s Boston triple-deckers to new Needham construction. We know what Greater Boston subfloors look like — and what they need. Ready to get your tile installation floor project done right? Contact us for a free consultation — we'll assess your subfloor, recommend the right tile and underlayment, and give you a detailed written quote with no surprises.
Frequently Asked Questions
How long does floor tile installation take?▾
Do I need a permit to install floor tile in Massachusetts?▾
What is the minimum subfloor flatness for tile installation?▾
What type of thinset should I use for floor tile?▾
How much extra tile should I order for a floor installation?▾
Can you tile over an existing tile floor?▾
Need Floor Tile Installation?
Send us photos and get a same-day estimate.