Tile installation for bathroom surfaces covers floors, walls, shower surrounds, and tub areas. Professional installation in Greater Boston costs $8–$25 per square foot (as of 2026 pricing), with full projects running $2,500–$8,000+ installed. The key to a lasting result: correct waterproofing, proper substrate prep, and full thin-set cure time before grouting. For a broad overview, see the Complete Guide to Bathroom Tile Installation. This article goes deeper on each surface and system.
- Waterproofing is non-negotiable — showers and tub surrounds need a membrane like Schluter Kerdi or RedGard before any tile goes up.
- Porcelain is the best all-around tile for bathroom floors and showers; ceramic works well for dry walls.
- Floor tile must be slip-resistant — look for a DCOF rating above 0.42 for wet areas, per ANSI A137.1.
- A standard full bathroom tile job in Greater Boston takes 3–7 days from demo to final grout seal.
- Order 10–15% extra tile for straight-lay patterns and up to 20% for diagonal or herringbone layouts.
- Professional labor in Massachusetts runs $6–$14 per square foot depending on tile size, pattern complexity, and surface condition (based on current Greater Boston rates).
What Is Involved in Professional Bathroom Tile Installation?
A bathroom tile installation covers four surfaces: floors, walls, shower surrounds, and tub decks. Each surface has different waterproofing requirements, substrate needs, and tile recommendations. In our 15+ years of work across Greater Boston, treating these surfaces the same is the most common mistake we see.
Floors need slip resistance and a deflection-free subfloor. Walls need flat, plumb backer board and proper adhesion. Showers and tub surrounds need a fully waterproof system before any tile is set. Getting the sequence right matters as much as the tile itself.
Here's the standard sequence for a full bathroom tile project:
- Demo existing surfaces and inspect subfloor and framing
- Make structural repairs — level the floor, straighten walls
- Install cement board or waterproof backer on walls and floors
- Apply waterproofing membrane in wet zones (shower pan, walls, niches)
- Plan the tile layout — snap chalk lines, find center points
- Set tile with appropriate thin-set mortar; allow full cure time
- Grout all joints with the correct grout type for the joint size
- Seal grout and any porous tile surfaces
- Install trim pieces, transition strips, and caulk all change-of-plane joints
Skipping or rushing any step causes problems — cracked tile, failed grout, and water damage behind walls. For a full cost breakdown, see our guide on bathroom tile installation cost in Boston.
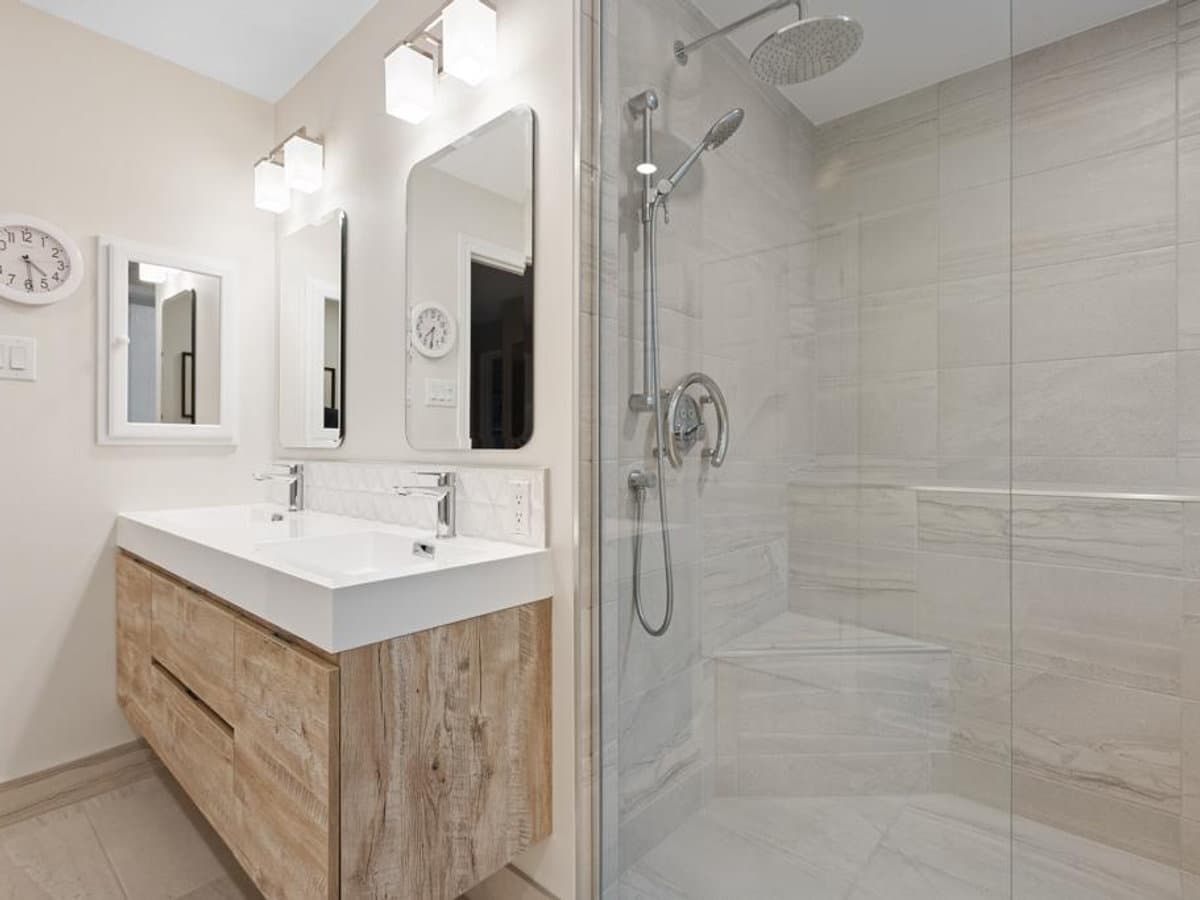
What Type of Tile Is Best for Bathroom Floors, Walls, and Showers?
The best tile depends on where it's going. Porcelain, ceramic, natural stone, and glass mosaic each perform differently on floors, walls, and in wet shower zones. Choosing the wrong tile for the surface is a costly mistake to fix later.
Tile Type | Best Surface | Water Resistance | Requires Sealing? | Material Cost (2026) |
|---|---|---|---|---|
Porcelain (e.g., Daltile Revolt, MSI Everlife) | Floors, showers, walls | Excellent (<0.5% absorption) | No (glazed) | $2–$10/sq ft |
Ceramic (e.g., Daltile Chromatic, MSI Soho) | Walls, dry areas | Good (glazed surface) | No (glazed) | $1–$5/sq ft |
Natural Stone (e.g., MSI Calacatta Gold marble) | Walls, floors (with sealing) | Low without sealing | Yes — annually | $5–$25/sq ft |
Glass Mosaic (e.g., Daltile Fanfare, Oceanside Glass) | Shower accents, walls | Excellent | No | $8–$30/sq ft |
Cement/Encaustic (e.g., Cle Tile, Granada Tile) | Dry floors, accent walls | Low — porous | Yes — frequently | $10–$30/sq ft |
Porcelain is the safest choice for most bathrooms. It resists water, handles foot traffic, and comes in every size and finish. Ceramic works well on bathroom walls where it won't see standing water. Natural stone is striking but requires annual sealing. Glass mosaic suits shower accents and feature walls. Avoid cement tile in showers — the porosity makes it nearly impossible to keep clean in wet zones.
Tile Size Recommendations by Surface
- Shower floor: 2x2, 3x3, or mosaic sheets — smaller tiles conform to the sloped pan and add grip through more grout lines
- Shower walls: 4x12 subway, 12x24 large-format, or 3x12 stacked — fewer grout lines mean less cleaning
- Bathroom floor: 12x12 up to 24x24 — larger tiles make small bathrooms feel bigger; stay under 24x24 in rooms under 50 sq ft
- Accent walls: Any size that contrasts the field tile — consider mosaic, zellige, or a larger-format tile in a different finish
How Do Professionals Prepare a Bathroom for Tile Installation?
Proper prep determines whether tile lasts 30 years or cracks in three. Floors need a stable, deflection-free subfloor. Walls need flat, plumb backer board. Wet zones need a waterproof system before any tile is set.
Subfloor Assessment and Deflection
Floor deflection is the top cause of cracked bathroom tile. Per TCNA (Tile Council of North America) standards, the subfloor must not flex more than L/360 of the span. That means a 10-foot span can deflect no more than 1/3 inch under load. Most 3/4" plywood subfloors in Greater Boston homes pass this test. Older homes with 1/2" subfloors or notched joists often fail.
Add a layer of 1/4" cement board over plywood as a minimum. Or use Schluter DITRA uncoupling membrane to protect against tile cracking from movement between the subfloor and tile.
Moisture Barrier Under Floor Tile
Outside the shower, a layer of polyethylene sheeting or RedGard under cement board adds moisture protection. Fasten cement board to plywood with 1-1/4" cement board screws every 6–8 inches in the field and 4–6 inches at the edges. Offset cement board seams from plywood seams by at least 4 inches. Tape all seams with alkali-resistant fiberglass mesh tape and thin-set.
Wall Prep: Backer Board Installation
Walls need a flat, rigid surface before tile goes up. Use Durock or HardieBacker cement board for walls that will get a separate waterproof membrane. Use Schluter Kerdi-Board or Wedi Building Panel where you want built-in waterproofing. Screw backer to studs every 8 inches. Fill all gaps and joints with thin-set before applying membrane.
What Is the Step-by-Step Process for Installing Bathroom Tile?
Tile installation follows a strict sequence. Each step must be complete and cured before the next begins. Rushing cure times causes cracked grout and failed adhesion — the schedule cannot be compressed.
Step 1: Build and Waterproof the Shower Pan
A pre-slope layer of mortar directs water toward the drain before the liner goes in. The slope must be 1/4 inch per foot toward the drain — a TCNA standard requirement. Over the pre-slope, install your waterproof liner: a CPE liner for a traditional mud bed, or a foam system like a Schluter Kerdi-Shower or Wedi shower tray for a faster option. Foam tray systems have become our standard because they eliminate liner failures and reduce cure time.
Step 2: Waterproof the Shower Walls
Cement board alone is not waterproof — it is only water-resistant. Every shower wall needs a membrane. Schluter Kerdi membrane bonds directly to cement board with unmodified thin-set. RedGard by Custom Building Products is a liquid membrane rolled onto cement board — it requires 2–3 coats and a pink-to-red color change to confirm full coverage. Tape all seams and corners with Kerdi-Band or fiberglass mesh before tiling.
Step 3: Waterproof the Shower Niche and Curb
A recessed shower niche must be waterproofed like the rest of the shower. Pre-made foam niches from Schluter or Wedi include built-in waterproofing. Custom niches framed with wood studs need a full membrane on all four walls and the floor. Slope the niche floor slightly toward the shower to prevent pooling.
The shower curb is a common leak point. Slope the top of the curb 5–10 degrees inward so water drains back into the shower. Wrap the curb fully with Kerdi or coat it with RedGard before tiling. Any missed corner at the curb is a direct water entry point to the subfloor.
Step 4: Set the Tile
Use a notched trowel sized to your tile. A 1/4" x 3/8" V-notch works for most wall tiles up to 12x24. Use a 1/2" square-notch for tiles 18" or larger. Back-butter large tiles to ensure full coverage. Allow thin-set to cure for 24–48 hours before grouting.
Step 5: Grout and Seal
Use sanded grout for joints wider than 1/8" and unsanded grout for joints 1/16"–1/8". Apply grout with a rubber float, working at a 45-degree angle to the joints. Wipe excess with a damp sponge in two passes. Seal all grout lines after they cure — typically 48–72 hours. Caulk all change-of-plane joints (floor-to-wall, wall-to-wall corners) with silicone — never grout these joints.
Why Is Waterproofing the Most Critical Step?
Water damage behind tile is invisible until it becomes a major structural problem. Proper waterproofing prevents mold, rot, and tile failure. Based on our 15+ years and 500+ completed bathroom projects across Greater Boston, water intrusion behind improperly waterproofed tile is the most common cause of full shower tear-outs.
What Is a Waterproofing Membrane?
A waterproofing membrane is a barrier — either a sheet product or a liquid coating — applied to the substrate before tile is set. It stops water from reaching the framing and subfloor. The most common systems in residential bathroom work are:
- Schluter Kerdi — a polyethylene sheet membrane bonded with unmodified thin-set; industry standard for full shower systems
- Custom Building Products RedGard — a liquid elastomeric membrane; faster to apply on complex geometry; requires 2–3 coats
- Laticrete Hydro Ban — a liquid-applied option with strong manufacturer warranties for tile installations
- Wedi board — a foam backer with a built-in waterproof coating; eliminates the separate membrane step entirely
Cement Board vs. Foam Board for Shower Walls
Product | Type | Waterproof? | Weight | Best Use |
|---|---|---|---|---|
Durock Cement Board (USG) | Cement board | No (water-resistant) | Heavy | Floors and walls with separate membrane |
HardieBacker (James Hardie) | Fiber-cement board | No (water-resistant) | Heavy | Floors and walls with separate membrane |
Schluter Kerdi-Board | Foam board | Yes | Light | Shower walls, niches, benches |
Wedi Building Panel | Foam board | Yes | Light | Full shower systems |
Schluter DITRA | Uncoupling membrane mat | No (uncoupling only) | Very light | Floor tile over plywood subfloor |
How Do You Tile Around Toilets, Vanities, and Plumbing Fixtures?
Tiling around fixtures requires clean cuts, proper waterproofing at penetrations, and a plan for finished trim. Rushing these details creates gaps and water entry points.
Around the Toilet
Always run floor tile under the toilet location before the toilet is set — don't tile around the base. This creates a flat, continuous surface. Use a wet saw or angle grinder to fit tile around the toilet flange. Leave a 1/8" gap between tile and flange. Fill it with flexible silicone caulk, not grout. Grout is rigid and will crack as the floor moves; silicone stays flexible and waterproof.
Around Vanities and Cabinets
For floating vanities, run tile under the cabinet footprint and cut cleanly to the wall behind it. For floor-mounted vanities, tile to the edge of the cabinet base — no tile needed underneath. Plan your layout so the cut line falls at a logical point, not mid-tile in a visible spot.
Plumbing Penetrations in Showers
Shower valve bodies, tub spouts, and showerhead arms all penetrate the tile wall. Each needs an escutcheon plate to cover the rough cut. Before setting tile, mark and drill penetration locations — use a diamond hole saw bit for porcelain. Apply waterproof membrane around each penetration before tiling. Fill the gap between tile and pipe with silicone caulk, not thin-set or grout.
What Are the Best Tile Patterns for Bathrooms?
The tile pattern affects the look of the room and the amount of tile waste you'll generate. Straight-lay patterns waste the least. Diagonal and herringbone patterns need up to 20% extra tile due to angled cuts.
- Straight-lay (grid): Tiles in aligned rows and columns. Classic, easy to install, minimal waste. Best for large-format floor tile.
- Offset/brick (running bond): Each row offset by half a tile length. Most common for subway tile on walls. Waste factor: ~10%.
- Herringbone: Rectangular tiles at 45-degree angles in a V pattern. Visually dynamic on floors and shower walls. Waste factor: up to 20%.
- Diagonal (45-degree): Square tiles rotated 45 degrees. Makes small rooms feel larger. Waste factor: 15–20%.
- Basketweave: Small rectangles arranged to mimic woven material. Traditional look for bathroom floors. Common with 2x4 or mosaic tiles.
- Large-format vertical stacked: 24x48 or 12x24 tiles set vertically with tight grout joints. Modern look; makes ceilings feel taller in showers.
In our 15+ years of bathroom tile work, herringbone remains the most requested pattern for shower floors. It hides lippage better than straight-lay and works with almost any tile style. Bar chart comparing bathroom tile materials by cost per square foot in Greater Boston 2026: Ceramic Wall Tile $4, Penny Tile/Hex $10, Large Format Porcelain $8, Zellige $18, Glass Mosaic $20, Marble $15. Also shows maintenance level (Low/Medium/High) and whether sealing is required for each material.
Accent Walls and Feature Tile
A feature wall behind the toilet, vanity, or at the back of the shower adds depth without a full tile budget. Use a contrasting tile — zellige, fluted porcelain, or a bold mosaic — on one wall and keep the rest neutral. This is one of the best ways to get a high-end look at a moderate cost. Keep the feature tile to one plane. Using it on more than one wall makes the pattern compete for attention.
How Much Does Bathroom Tile Installation Cost in Greater Boston?
A full bathroom tile project in Greater Boston typically runs $2,500–$8,000+ installed, depending on square footage, tile selection, and surface complexity. That includes labor, materials, and all prep work (as of 2026 pricing).
Typical Cost Breakdown
Cost Component | Typical Range (Greater Boston, 2026) |
|---|---|
Ceramic wall tile (material only) | $1–$5 per sq ft |
Porcelain floor tile (material only) | $2–$10 per sq ft |
Natural stone tile (material only) | $5–$25 per sq ft |
Professional labor | $6–$14 per sq ft |
Waterproofing membrane (Kerdi or RedGard) | $200–$600 per shower |
Cement board / backer installation | $1–$2 per sq ft |
Grout and thin-set materials | $0.50–$1.50 per sq ft |
Demo and haul-away | $300–$800 per bathroom |
For a full cost analysis with Greater Boston-specific data, see our 2026 bathroom tile installation cost guide for Boston.
How Long Does Bathroom Tile Installation Take?
Timeline depends on bathroom size and surface complexity. A small half-bath takes 2–3 days. A master bathroom with a full shower, floor, and feature wall realistically takes 5–7 days.
- Day 1: Demo, subfloor inspection and repair, cement board installation
- Day 2: Waterproofing membrane application; allow 24-hour cure for RedGard
- Day 3: Shower pan and wall tile installation begins
- Day 4: Wall tile completion; floor tile layout and installation
- Day 5: Grout installation across all surfaces; thin-set must cure 24–48 hours before grouting
- Day 6–7: Grout sealing, caulk at all transitions, trim installation, final clean
Rushing cure times between steps causes cracked grout and failed adhesion. The schedule cannot be compressed, regardless of project urgency.
Should You DIY Bathroom Tile Installation or Hire a Professional?
For showers and wet areas, professional tile installation for bathroom surfaces is strongly recommended. A failed shower waterproofing system can cost $3,000–$10,000 to remediate — often more than the original installation.
Certified installers understand deflection requirements, membrane compatibility, and grout joint sizing. Most DIYers skip these details. For dry areas like a laundry room floor or a kitchen backsplash, confident DIYers can get good results. But for bathrooms — especially showers — the risk is too high to guess.
DIY vs. Professional: Quick Decision Framework
- DIY is reasonable for: Dry floor areas, accent walls in low-moisture zones, small backsplash projects
- Hire a professional for: Any shower or tub surround, floors with deflection concerns, natural stone installation, large-format tile (18" or larger), any project requiring permits
- Check local requirements: Some Massachusetts municipalities require permits for full bathroom renovations — confirm with your local building department before starting
- Cost reality: Professional tile installation for bathroom projects adds $6–$14 per sq ft in labor (as of 2026 rates), but a DIY failure in a shower can cost 2–3x that to repair
How Do You Care for and Maintain Bathroom Tile After Installation?
Proper maintenance extends the life of your tile and grout. Most bathroom tile requires very little upkeep when installed correctly.
- Seal grout annually in high-moisture areas like showers and floor joints — use a penetrating sealer rated for your grout type
- Seal natural stone (marble, travertine, limestone) at least once a year; use a stone-specific penetrating sealer
- Clean weekly with a pH-neutral cleaner — avoid vinegar or bleach-based cleaners on grout or stone; they degrade the sealer over time
- Recaulk change-of-plane joints (floor-to-wall, wall corners) every 2–5 years as silicone ages and shrinks
- Address cracked grout immediately — open grout joints let water behind the tile and accelerate substrate damage
- Run the exhaust fan during and for 15 minutes after every shower to reduce humidity and slow mold growth in grout lines
As certified tile installers with 15+ years of experience and 500+ completed projects across Greater Boston, the team at Aguirre Modern Tile handles every surface, substrate, and waterproofing detail from demo to final seal.
Ready to tile your bathroom the right way? Contact Aguirre Modern Tile for a free bathroom tile installation consultation — we'll assess your shower, floor, or full bathroom, recommend the right tile and waterproofing system, and provide an accurate written estimate.
Frequently Asked Questions
What is the best tile for a bathroom floor?▾
How long does bathroom tile installation take?▾
Do I need a waterproofing membrane under shower tile?▾
What type of thin-set mortar should I use for bathroom tile?▾
What is the recommended grout joint width for bathroom tile?▾
Should I hire a professional or DIY my bathroom tile installation?▾
Need Bathroom Tile Installation?
Send us photos and get a same-day estimate.